Here's a look at the end product from the Thule and Choris pottery that I was working on earlier this spring for the Cape Krusenstern order. The goal was to produce two large paddle impressed sherds of Thule pottery based on a specific artifact and an assortment of at least two fragments of paddle impressed Choris pottery. The complete vessels shown in the photos were back ups in case I ran into problems and needed more pots to break. Luckily, I didn't have major problems and I have a complete Thule and Choris pot to display in my office.
The sherds came from the half pot
I'm very pleased with how the clay pots turned out. In the future I'd like to experiment more with the firing process and see if I can't get a harder ceramic, but based on what I've read about Alaskan pottery and other people's experiments, these vessels are well within the range of pottery that was produced in Alaska. They are very soft and really not much more than dried clay. When I cut the Thule pot in half with a dremel to create the two large sherds the vessel walls had the consistency of drywall. There was a very thin glazed layer, especially on the inside that was a little harder and more durable that I believe formed from the seal blood and fat layer in the firing. Considering how soft the interior of the walls were this layer would have been pretty important in protecting the vessel and keeping it all in one piece.
These are the final sherds that I included in the order. I touched them up a bit to antique them, but generally I'm pleased with the results. They look a lot like the sorts of sherds that show up in archaeological sites.
A complete Choris pot and sherds from a similar vessel
I finally finished all of the reproductions in the Cape Krusenstern order. The reproductions are based on artifacts spanning several thousand years from the Denbigh Flint complex up to Thule and include ceramics, chert and obsidian lithics, chipped and ground slate, ground and polished nephrite, and carved jet and antler tools. There are 23 different artifacts in the set and I made two identical reproductions of each which were antiqued to match the originals. A lot of the materials were familiar, but several of the cultures, like Choris and Ipiutak, were new to me as were the jet labret and pottery. It was an enjoyable project and there are a few specific pieces that I'd like to show in a bit more detail in the upcoming posts, but for now - here is a look at the full set.
Lots of antiquing - I'm pleased with how dusty and old the reproductions look.
In addition to all of the pieces shown here there are a couple bags of miscellaneous flakes which I'll send to the client that were left over from knapping some of the bifaces.
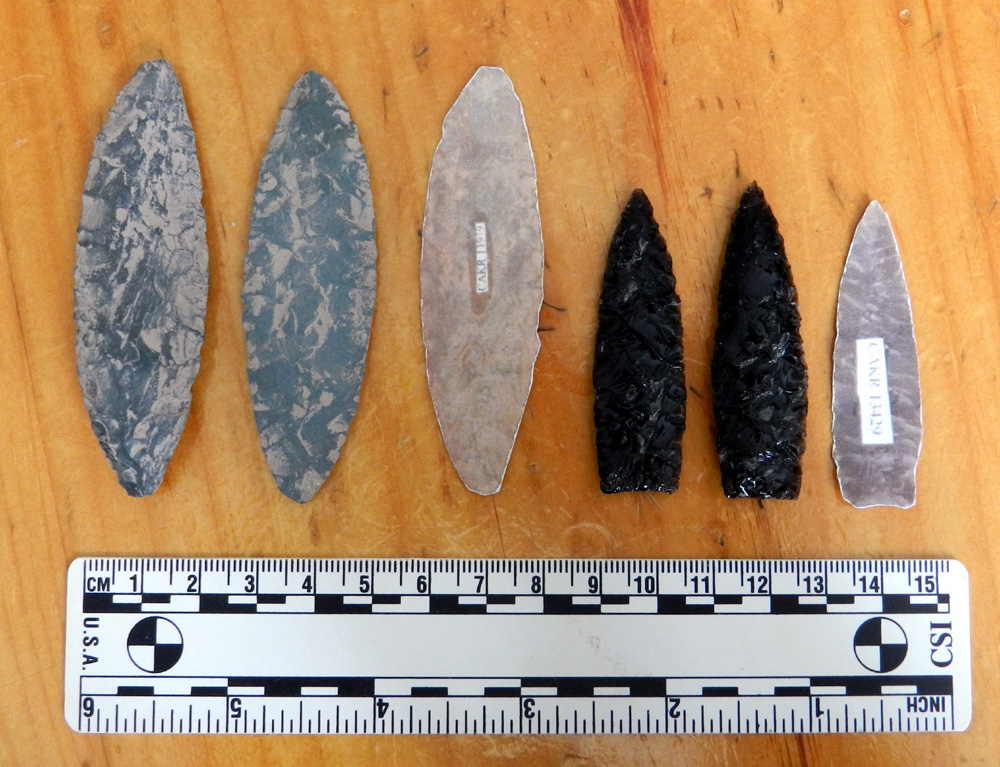
Two by two, I'm working through the Cape Krusenstern order. The most recent reproductions to go into the finished box are a pair of Choris points and Choris bifaces. I'd mentioned the diagonal flaked Choris points before, but it turns out that the original artifact was made from obsidian. Since it was the only obsidian artifact found at this particular site its material type was important enough to redo the point in the correct material. Its not a bother - I get to keep those little flint Choris points that I made a few weeks ago.
The reddish mud coating the bi-pointed biface on the left helps match the original artifact.
A dozen or so pieces are finished, although I do keep going back and tweak the antiquing. The more layers of mud or staining that goes on a reproduction the more depth and age the piece takes on.
I fired the Thule and Choris/Norton pots yesterday, with generally positive results. Laurie let me use one of the fire pits on The Compound for this phase of the project. Of the six pots that started the firing, one was reduced to a ziploc bag full of barely recognizable pottery sherds by the end of the day. The remaining five stayed in more-or-less one piece, although two had sizeable heat spalls pop off in the second hour of the firing.
Looking good on the outside
I fired them for just under three hours, turning them every 10-15 minutes. I'm not sure exactly what the firing accomplished. I wouldn't say that the pots are fired like ceramics in a kiln. I don't think there was a significant change in the chemistry of the clay, but it got hot and dry and hopefully a little harder and more durable. They should be a little more stable now, although I didn't get all of the colour change that I was hoping for. A couple of the pots have a good colour on the outside, but the clay inside is still very light coloured. I need them to be almost black in cross-section so I'll have to antique them a bit more once I crack the sherds into shape.
The six pots before the firing.
The five survivors at the end.
This one lasted about a minute
I had originally planned to put two pots directly in the fire and heat the remaining four around the edge. These are pretty fresh pots, with a lot of moisture in them. I made half of them five days before the firing and the other half four days before the firing. In pottery terms, I'm sure I would have had much safer results if I had waited another week or two for the pots to dry. But, even stretching the drying time to four or five days was pretty generous for this style of pottery which would traditionally go from raw clay to firing all in one day. The plan to put two pots in the fire ended pretty abruptly when the first pot that I put in started exploding almost immediately. It kept popping like popcorn until it was rubble. The two video clips below show the pot popping. Based on that, I didn't bother putting a second pot into the fire.
At the end of the firing, I fished these and a dozen other fragements from the exploded pot out of the coals.
They hold water without reverting to mud
When I got the pots home I wanted to see if they would hold water. They were still warm from the fire and I didn't want to risk thermal shock so I filled them to the brim with warm water. They all held water, so I let them sit for about 15 minutes to see if the water would slowly seep through them or if they'd turn back into mud. When I checked on them again, the two blood coated Thule pots had developed big cracks around the rim. I'm guessing that they started to reabsorb the water and tried to expand, which led to the cracking.
Cracks formed in the two thicker pots with the best seal blood coating. There was one thick pot that didn't crack, so I don't think it was thickness alone that caused the problem.
Surface heat spalls
So at the end of the day, I really only have one pot left intact. Two survived the firing, but are now cracked from the water, two have surfaces pitted with heat spalls, but can hold water, and the sixth pot is in inch sized fragments. As far as making pots go - this would have to fall into the "learning experience" rather than "howling success" category. However, for making sherds, I think I'm still on track and can continue to work with these vessels. Even the surface heat spalls might work out for me. The sherd that I'm trying to match has a couple areas where the outer rind of the pot has flaked off in a similar size and shape to the heat spalls.
The interesting things that I want to remember for next time:
Don't put the pots in the fire - heat them around the edge of the flames.
Pots coated with seal blubber only were the ones to experience surface heat spalls after 2 hours of firing.
The seal blood adheres to the pots best if it goes on while they are still cool and barely dry. Blood smeared on the pots on the hot sunny day flaked off in the firing.
The two thickest pots with seal blood coating were the two that cracked from the added water. Thinner pots and those smeared with seal blubber only, did not crack.
The three pots in the foreground had seal blood on them at the start of the firing. The two on the left had the blood applied on a cool day, while the pots were barely dry. It stayed caked on and was cooked onto the surface - although they are also the two pots that cracked when I filled them with water. The taller pot on the right had the blood coating applied on a hot sunny day and it never really adhered like the other two.
I stayed on a pottery kick over the weekend. You never know when you might need some Choris/Norton pottery to go with your Thule sherds, so I added some fine linear grooves to the back of the paddle that I used to make the Thule style pots and made some earlier style vessels. In order to make these vessels look a little more like Choris or early Norton pottery I made the walls thinner with narrower corrugated paddle stamping and tried to shape them more like earlier pottery forms.
Small pot and paddle
These ones have a little more sandy grit temper added and I tossed in some feathers along with grass for the organic temper. To form the pots, I either made a flat base and then attached a donut of clay to that base to form the walls, or just started pinching out a pot from a ball of clay. As soon as I could support it on one or two fingers I started paddling it to form the vessel. I liked the paddle, it seemed to help seal up any tiny cracks that formed at the same time that it thinned and raised the walls. I had some good tips from Wendy Shirran, the clay studio coordinator at the Craft Council Clay Studio. She took pity on me when I went to pick up the clay. Between Wendy's advice and An Experimental Approach to Understanding Thule Pottery Technology I haven't gotten stuck yet.
Smearing on the blood
When the clay was leather hard I added seal blood and grease to the surface as a kind of organic slip. I have six pots on the go right now and all of them have some seal oil on them and four of them have seal blood. I smeared the blood on to two of the pots while they were still a little damp and it actually seeped into the clay and disappeared where it was damp. It was cool and damp when I coated the first pots with blood and it went on fairly smoothly and adhered well. I added blood to the other two this morning and brought the first two out into the direct sunlight and the blood layer started drying and cracking. I smeared them with seal fat to try to slow the drying and refix some of the blood.
The inside of this vessel was completely coated in seal blood, but the lower half was still a little damp. It absorbed the blood overnight, while the top inch or two stayed bright red.
In the direct sunlight the blood starts to craze and crack off. But that's ok - this crazing pattern shows up on Thule pottery.
I smeared grease and wet blood on top of the cracked layers to try to seal in the pattern and preserve it for the firing. I'm really hoping that this pattern will survive the firing.
Starting to look old
The crazing that formed in the dried blood as it cracked looks fantastic. Everything is bright and fresh, but the pattern and texture over the paddle stamped pottery beneath is turning out to be a perfect match for the archaeologically recovered pots. I'm really hoping that the crazing pattern is preserved through the firing and I'm optimistic that the blood red will turn to a more rusty brown and black. We'll see, but right now everything seems to be lining up the way it should.
They certainly smell authentic.
The great pot in the background is coated in seal grease. I'm not certain how everything will react with the heat of the firing, but I'm hoping that the organic grease layer will darken and burn. I'm surprised how much grease the clay will soak up.
For the next couple of months I'll be working on artifact reproductions full time. I have a few wholesale jewelry orders to fill, but most of the work will be for universities and parks to use in interpretive or educational programming. The two big projects that I'm working on at the moment are sets of reproductions based on artifacts found in digs at Red Bay, Labrador and Cape Krusenstern, Alaska.
Groswater side-scraper needs a handle
I'll talk more about the artifacts as I finish the reproductions over the coming weeks. Both are fun. The artifacts for the Labrador project are mainly Archaic and Groswater Palaeoeskimo, which I'm pretty comfortable with, but there is always something new to learn or new techniques to experiment with.
Roughing out a Choris biface
The Alaskan artifacts are especially interesting to me because they are related to the Eastern Arctic cultures that I'm particularly fond of, but they have their own unique twists. The people living in the Eastern Arctic came there from the west at least a couple of different times in the past. There are some interesting ancestral or transitional artifact styles in Alaska that help put archaeology in the Canadian Arctic into context and I'm looking forward to reproducing some of those artifacts this spring.


 PDF
PDF