Showing posts with label Ivvavik. Show all posts

Wednesday, October 28, 2009

Ivvavik, Aulavik, and Tuktut Nogait Recap

This is the final post on the Parks Canada project and then I'll stop talking about it. It went on a few weeks longer than I expected and I blame a lot of that on the weather slowing down some of the final drying stages. The photos show the original Inuvialuit artifacts alongside the reproductions. These aren't casts - they are 1:1 reproductions made in the original materials; wood for wood, antler for antler, tin for tin, etc. All of the artifacts have Parks Canada numbers attached to them somewhere. I marked or engraved a "TR" in the same location on all of the reproductions to help distinguish them from the originals. I have one last meeting in at The Rooms this morning. Elaine Anton has been a tremendous help arranging the shipping and storage of the artifacts while I've been working on them. Today she assesses the condition of the artifacts to ensure that there was no deterioration of their condition over the summer and we'll package everything up for FedEx to pick up. Later today the artifacts go back to the conservation lab in Winnipeg and the reproductions head to the Parks Canada Office in Inuvik.

Ivvavik National Park:


Artifacts in the middle, reproductions above and below


Artifacts in the middle, reproductions left and right

Aulavik National Park:


Artifacts (bottom) Reproductions (Top)


Artifacts (bottom) Reproductions (Top)

Tuktut Nogait National Park:


Artifacts (bottom) Reproductions (Top)


Artifacts (bottom) Reproductions (Top)

Photo Credits: Tim Rast

Photo Captions:
First: The "TR" Signature. Well, technically I snuck in a Lazy L there for my middle initial, too.
Second-Seventh: Artifact Comparisons.

Monday, October 26, 2009

Final Parks Reproductions

Here's a look at the last of the Inuvialuit artifact reproductions done for Parks Canada in Inuvik. I'll post side by side group shots of artifacts and reproductions from each of the three parks in a future post.

Tuktut Nogait Bow: Tuktut Nogait National Park. This reproduction was great fun to do and although this isn't a functional bow I learned a lot about bow-making from this artifact and I still plan to make a working copy of this bow over the winter. Its made from yew. Its in two parts with a V or fishtail splice through the shorter, lower limb. Its very light and thin limbed compared to a lot of other cable backed bows that I've come across.
In each photo the artifact is shown closest to the ruler, with the reproduction on the opposite side. In the first two photos the pieces are shown belly side up, and in the third the bow's back is facing up. I've already talked a lot about making this piece in earlier posts. Finishing involved a lot of wire brushing to bring out the wood grain and match the weathered texture. The colour and texture matching came from rock dust, sawdust, water based stains, red ochre, charcoal, and burnt umber. This is a piece that will benefit from handling. The more wear and tear the reproduction gets the better it will look.


Slate Knife: Ivvavik National Park. The artifact is in the middle. This knife is a little unusual in that its chipped slate instead of ground slate. Ground slate knives may be roughly shaped by flaking, but slate isn't a very good stone for knapping. Usually slate is finished by grinding and polishing. The handle portion of the original artifact is almost completely unworked, so the chipped blade may have been a quick attempt to turn a knife shaped rock into a real knife. Slate is a pretty soft stone that likes to break apart along flat planes, which is why its so difficult to knap. Under the sawdust and woodshavings in in my workshop there are at least a dozen failed attempts at making these two knives. I finally had to go with a slate that isn't as perfect a colour match as what I was hoping, but the best look alike slate I had found refused to stay in one piece. These reproductions will be much more durable, I feel much more confident sending them off knowing that they will be able to hold up to the sort of handling they are intended for.

Antler Handle: Tuktut Nogait National Park. This is an antler socket that was extremely deteriorated. It was a challenge to reproduce because I wanted to match the flakey weathered look of the original, but at the same time have something that wouldn't fall apart being handled. There's not much point in making a reproduction of a fragile artifact that is more fragile than the original. To match the texture and colours of the piece I used layers and layers of sawdust, antler dust, whalebone shaving, and rock dust. In between the layers I'd brush with a wire brush to create the pitting and texture of the disintegrating antler. There was plenty of blowtorch in there as well.
In both photos the artifact is on the left and the reproduction is on the right.
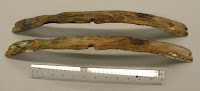
Kayak Rib: Tuktut Nogait National Park. This was that bent wood piece that was giving me so much trouble. I finally got it to hold its shape by building a stand for it. As long as its stored in its stand there's no danger of it straightening out again. There is an interesting patch of green staining on one end which I used verdigris from the copper experiments earlier in the summer to match. It gave a very good match - I wouldn't be at all surprised if the staining on the artifact came from contact with copper.
I keep referring to this as a kayak rib, because that's what I think it is. I don't have any evidence for that other than the fact that its shaped an awful lot like a kayak rib and I'm not sure what else it might have been used for.
In both photos the artifact is closest to the ruler. I'm going to try to be more consistent in the future with my photography or artifacts and reproductions, with artifacts always below or to the left of the reproductions.

Photo Credits: Tim Rast

Photo Captions:
Top: Detail of Tuktut Nogait collection comparison - more to come next time!
Second: Side by side comparison of Tuktut Nogait Bow (Artifact: Left, Reproduction: Right)
Third: Side by side comparison of Tuktut Nogait Bow limb (Artifact: bottom, Reproduction: top)
Fourth: Side by side comparison of Tuktut Nogait Bow (Artifact: bottom, Reproduction: top)
Fifth: Slate Knife, artifact in the middle, reproductions above and below
Sixth: Antler socket comparison, (Artifact: Left, Reproduction: Right)
Seventh: Antler socket comparison, (Artifact: Left, Reproduction: Right)
Eighth: Wood rib comparison, (Artifact: Bottom, Reproduction: Top)
Ninth: Wood rib comparison, (Artifact: Bottom, Reproduction: Top)

Wednesday, October 7, 2009

Newly Completed Parks Reproductions

Here's a look at the most recent batch of completed artifact reproductions. These are some of the bigger pieces that Parks Canada is having me reproduce, so having them in the finished pile makes me feel like the work is almost over. At this point the bulk of the work is done and its coming down to some very nit-picky back and forth antiquing.

Wooden Handle: (Ivvavik National Park). This artifact (middle in both photos) has a few competing interpretations, including dog whip handle and gaff handle. My preference is gaff handle. There is a rust stained channel on one end with a squarish cross section that appears to have held an iron object, perhaps an iron spike modified into a gaff hook. There is a ghost of a cord wrapping around that channel which would have held the iron object in place. The artifact has a roughly octagonal cross-section and the end opposite the rust stained channel is burned. It looks like the rest of the gaff handle was burned away.
Probably the most challenging aspect of this reproduction was matching the ghost of the cord wrapping. On the artifact, the points where the cord touched the wood are light and the darker staining is in the gaps between the cord. So I couldn't just stain a cord and wrap it around the handle, because that would give me the opposite pattern that I needed. That would stain where the twine was, not where the twine wasn't. Instead I coated a length of twine in beeswax, twisted it to match the twist of the cord on the original artifact and then applied a water-based stain. The wax blocked the stain from penetrating the wood everywhere that the cord touched, but it could concentrate in the gaps between the twists in the cord. I put on a coat of wood conditioner before wrapping the cord and applying the stain to try to keep the stain from seeping into the wood grain too much.

Drilled Antler: (Aulavik National Park) I didn't really expect to get as close a match as this turned out to be. I've talked in other posts about all the shaping and bending that went into this piece. It was tough to create a natural looking antler surface on a piece that was almost completely modified from the original, but I'm happy with the results. There are many layers of antler dust, charcoal, rock dust, saw dust, carpenters glue, and wood stain to create the cracked weathered look. In the photo with the case, the reproduction is in the foreground and the artifact is in the background.

The main area that I wanted to leave natural antler was in the cross-section of the cut. Six holes were drilled through the antler and then it was cracked off through the holes. The best way to make that look real was to drill six holes and then crack it. I got lucky and it cracked just like the original. In the photo, the artifact is on the left and the reproduction is on the right.


Whalebone Adze Socket: (Ivvavik National Park) This is one of those reproductions where the raw material does half the work for you (artifact is in the center). There isn't any other material that looks or feels quite like whalebone. In the photo at the top of the post you can see the hole where the bit would have been inserted, probably stone. The narrowed section is the hafting area for the handle, which are often made from a section of caribou antler and tie on with skin lashings. An adze is a woodworking tool, similar to an axe, but with the blade mounted flat, like a hoe. It would also be very handy for working whalebone, which can be worked similarly to wood. There is very little antiquing here, just a bit of tea staining and then a smudge of charcoal to match a greasy black patch on the top of the original.

Photo Credits: Tim Rast

Photo Captions:
First: Whalebone Adze Socket (middle) and reproductions
Second: Wooden Handle (middle) and reproductions
Third: Wooden Handle (middle) and reproductions
Fourth: Staining the cord markings
Fifth: Drilled Antler reproduction (forground) and original artifact
Sixth: side by side comparison of drilled end, original artifact on the left
Seventh: Whalebone adze socket (middle) and reproductions

Wednesday, September 23, 2009

Scraper and Fish Hook - In the Bag!

When I got back from the Rooms yesterday there were two tow trucks and a police car parked in front of our house. Traffic was crawling along and there was a car in the street scrunched diagonally into a parked car a few doors down from us. Before hitting that parked car they'd clipped the mirror off of our neighbors car who was parked right outside our house. We got pretty lucky. Parking at The Rooms has been terrible this summer, but if I hadn't been there for a couple hours yesterday afternoon, then our car could have been the one with the missing mirror or the crumpled fender.

Here are two more finished pieces.

Flake Scraper: This is an artifact from Aulavik. (original on the right) Its made from quartzite, that was probably collected near the site from glacial till. I have a tough time getting quartzite in Newfoundland, but I was lucky to have met Jack Cresson a couple years ago and he left me a couple pieces of meta-quartzite from his neck of the woods. I believe the piece I used on this reproduction is from New Jersey. Its an excellent texture match for the artifact, which is a simple scraper made on a bifacial thinning flake. It would have been struck from a larger tool and then modified on one face to create a steep scraping edge. In the photos the flake platform is at the top of the photo and the scraper edge is at the bottom.

When I look at these photos they are kind of like looking at that optical illusion of the cake with the missing slice - sometimes they look right and sometimes they look upside down to me.. The convention in archaeology is to photograph flakes with the platform at the top, but scrapers are usually photographed with the working edge at the top. I photographed this like a flake, instead of a tool, so for archaeologists looking at this picture the flake properties are probably accentuated. It looks like a flake made into a scraper. If I would have photographed it with the scraper edge at the top I would be emphasizing the 'toolness' of the artifact over the 'flakiness' of it. If I wanted to argue that this was a lightly retouched flake quickly modified into an expedient tool, then these are the photos that I'd use. If I wanted to argue that this is a carefully made scraper, perhaps a diagnostic form, then I'd use a photo with the scraper edge at top. I wasn't thinking about all this when I took the photo, it just looked right to me to photograph it with the platform at the top, but another archaeologist could look at the same object and instinctively orient it the opposite way. Sometimes that bias creeps in unintentionally, but sometimes its used intentionally to bolster one interpretation over another.

Fish Hook: The original fish hook (middle) was found at Ivvavik National Park. I mentioned this one in an earlier post and here's a look at the finished reproductions. The two holes at the thin end are for attaching the fishing line and a metal or bone spike would have been fastened in the large hole at the bulb end. In this photo, I'm holding the object in my hand - this is how archaeologist's say "This is a very cool object and if we don't find something better I'll put this picture on the report cover."

Photo Credit: Tim Rast

Photo Caption:
Top: Ventral surface of the fish hooks - original in the middle
Second: Dorsal surface of the flake scraper - original on the right
Third: Ventral surface of the flake scraper - original on the right
Fourth: Dorsal surface of the fish hooks - original in the middle

Friday, September 18, 2009

Snow Knife and Bow Update

I just drove back from The Rooms in the pouring rain. September is the floodiest month in St. John's. I have a couple more pieces finished for Parks, which is good since I'm basically at the end of the time allotted for the contract. I have a fair bit of work left, although a lot of it is antiquing and finishing work which mostly means waiting for stuff to dry. In St. John's, in September, the floodiest month.

Whalebone Snow Knife: The original (middle) is from Ivvavik National Park. I made one of these for Parks last year and this year I did two more copies. Almost all of the whalebone artifact reproductions that I made this year came from one big rib that I got last spring from Dave Snow at Wildland Tours. Thanks Dave! I Really like working whalebone, it has all the best properties of wood and antler. If I use power tools it works best dry, otherwise it gums things up. If I use hand tools it works best wet - a little soaking in water does a lot to soften it. You can chop it with an axe and not worry about it splitting along the grain like wood. It sands nice and takes colour well. It can be porous and spongy or dense like antler. The original snow knife is a lightly modified rib from a smaller whale. I had to carve my reproductions a little to match the natural surface features of the smaller rib, but I'm happy with the end results. I'll probably dust them a little bit, my copies are a little shinier than the original at the moment, but these are pretty much done.

Tuktut Nogait Bow update: I've been cautiously working on the bow reproduction. The yew stave is starting to take shape. The bow blank in the photos is the one for Parks. The back is pretty much finished and the rest of the wood will come off the sides and belly of the bow. I get kind of attached to projects like this and while I'm looking forward to the final reproduction, I'm not looking forward to chopping the limb off and desicating the wood. It seems a shame to butcher it like that. But I do have a second one on the go that will be a keeper for me.


My plans for the working copy have changed a bit. I'm not going to try to incorporate the spliced limb into the bow from the beginning. There is a stage in bow making called "tillering" where you very gradually remove wood from the limbs and test how they bend. The way the Tuktut Nogait bow had one limb spliced on and held in place by lashings around the cable backing will make tillering more difficult than I think I'm ready for. My plan now is to make my working bow in one piece. Adding the spliced limb can be a seperate project at a later date. I'm also going to need to decrown the back of the bow. The original has a very flat back and after talking to bowyers who have made similar bows that is an important detail to keep the cable backing centered. I'm kind of glad of that actually, I'm finding it a little easier to keep track of and follow the tiny growth rings of the yew on the decrowned bow.

Photo Credits: Tim Rast

Photo Captions:
Top: Barbed Point reproduction in progress
Second: Whalebone Snowknives
Third, Fourth: Tuktut Nogait bow and reproduction in progress

Wednesday, September 16, 2009

Gone Fishin'

Lori's off for a few days of archaeological survey work on the Northern Peninsula. Hopefully she'll tell us all about it in the near future. The plan is to come back early next week, but if they find something, they may have to stay longer. There's potential to find some fantastic stuff, so I'm pretty jealous.

I've got a few days of cutting, grinding, and antiquing to look forward to. Yesterday was a visit to the Rooms to compare my Parks reproductions to the Inuvialuit artifacts. I didn't get to cross anything off the list, but things seem to be more or less on track.

Here's a look at a fish hook that I'm reproducing. The original (in the middle) is from Ivvavik National Park and is made from a very unsual ivory with alternating light and dark bands. There is a good chance that its some kind of tooth, most likely beluga whale. The Parks folks in Inuvik got me some beluga teeth from the Department of Fisheries and Oceans last spring to experiment with. They are definitely shaped like the fish hook, and they do have banding inside them from growth layers, but I couldn't get the right look anywhere. The bands are at the wrong angles and the beluga tooth reproductions wound up looking less like the original than using walrus ivory with tea died bands.

The fish hook has two holes at one end to attach the line to and a single larger hole at the other end for a metal or bone spike. The little copper awl artifact is the kind of thing that would have been stuck through the bottom hole to serve as the actual hook. The ivory is more of the lure. From the staining on the surface the hook was wrapped with a spiral of red string that left a pink stain on the ivory. To simulate the pink stain I found that beet juice works great. I dipped a string that was the right thickness in a little dish of beet juice and wound it around the reproductions while it was damp. The only string I had that was the right diameter was green, so you don't really get the red effect in the photos, but when you peel the dried string off after an hour or so the pink stain is there. The ivory actually has tiny indentations on the edges for the string to sit in, which makes reconstructing the string pattern that much easier.

The final bit of antiquing on these pieces will be dabbing on a bit of oil-based stain to create that brown blob in the middle of the original. I'll need to spray on a clear finish as well to seal in the beet stain. I can fade it a bit by rubbing some of the pink off, but once its at the right shade I want to seal it in and stabilize it.

Photo Credits: Tim Rast

Photo Captions:
Top, Lori waiting for the Boss to get his field shoes on as they head out for the Northern Peninsula to do Important Scientific Research.
Second, Ivvavik Fish Hook, between two walrus ivory reproductions, in progress
Third, Beluga Whale Teeth - Fresh!
Fourth, Beet staining the reproductions

Monday, August 24, 2009

A Tipping Point -- The First Finished Parks Pieces

We have some leaves scattered around the back yard, so it must have been windy last night, but we seem to have come off pretty lightly in St. John's from the passing of what was left of Hurricane Bill. The biggest impact on our household was the loss of the satellite signal for 5 minutes in the middle of last night's episode of True Blood. Mercifully, the storm broke the humidity that we had all day and the wind and rain made for perfect sleeping weather.

Today is a normal workday. I'm in the shed making the modifications to the Parks reproductions that I mapped out on Friday. The Rooms visits to check on the progress are getting kind of overwhelming. I have pretty much every piece on the go now, which is a lot to keep track of in my head. However, I'm hoping that I'm passed a tipping point in the project -- some of the pieces are finished and won't have to go back for comparisons anymore. Hopefully, from now until the end of the project, there will be a steady stream of finished reproductions. I'm looking forward to having fewer pieces to keep track of. Here are the first pieces that I finished.

Net Gauge, Ivvavik National Park: The original artifact is in the middle and the reproductions are above and below it. I've talked a bit about this artifact in a previous post. Its a key shaped tool used to measure the diameter of the gaps in a fishnet. Its made on softwood and I tried to match the weathered surface using a combination of wood stain, rock dust, ochre, and a clear matte spray finish.

Stone Scraper, Banks Island: This one was a little challenging, but unless I can figure out how to stain the stone more I think it will stay in the finished pile. This little scraper was made on what looks to be a pebble with a reddish cortex and green interior, with blue and white layers in between. Its such a specific combination of colours and textures that even if I had complete access to the source of the stone (which I don't) it would still be unlikely that I'd come across an identical stone. I went through boxes and boxes of rock and found a heat treated flake from a source that I'm not certain off (Florida, maybe) that had a similar red cortex and colourful interior. I knapped the scraper to keep the patch of cortex in the same location as on the original and tried staining the stone darker with ochre and shoe polish, with mixed results. Maybe green shoe polish would give a closer match - does that exist? For now its in the finished pile, because I don't know what else to do to make it any closer to the original.

Photo Credits: Tim Rast

Photo Captions:
Top: Aftermath of Bill - note the scattered leaves.
Second: Net Gauges. The original artifact is in the middle.
Third: Scraper and flake
Fourth: Scraper and scraper reproduction made on the flake in the previous photo.

Monday, August 17, 2009

How To Get A Round Rock

My aunt Marlene left this morning on a 5 am flight bound for Regina via Toronto. Uncle Gary booked later and couldn't get the same flights, so he's with us until Tuesday evening. They rented a car over the weekend and toured around the Irish Loop and some of the Baccalieu Trail.

Lori and I had a pretty quiet weekend at home. I worked a little on two stone ball reproductions from the collection of artifacts from Ivvavik National Park. The original artifact is pretty close to a perfect sphere and is about 3.5 cm in diameter. It was found in a historic site alongside other toys. Without scratching it or cutting into it its pretty hard to identify the material. It could be clay or stone. I've shown the object to archaeologists and potters and opinions are split. Parks Canada showed this object and the others from Ivvavik National Park to Inuvialuit elders and the majority identified it as a round stone similar to others that they had seen within the area. I'm more comfortable working with stone, so I've chosen to make the reproductions from limestone that I picked up on the west coast of Newfoundland. The weathered surface of the stone is very similar to the weathered surface of the Ivvavik artifact.

I carve the stones into a sphere using my angle grinder with a diamond cutting blade and then tumble them in a rock tumbler for a couple days to erase the tool marks and wear down the facets. The secret to grinding a sphere out of rock is to look for the sharpest angles and grind them down blunt. Keep turning the rock looking for the sharpest angles. Unfortunately the natural weathered surface of the stone is worn off almost immediately and I need to antique the surface to recreate that worn cortex. To add the cortex I use a combination of red ochre, soapstone and limestone dust, diluted carpenters glue and a blow torch. I'm working towards a dusty texture and a warm yellowish-buff-brown colour. I made one of these for Parks last year and I know that I can get a pretty good match to the artifact if I keep adding lots and lots of very thin layers. I'll compare the progress so far to the artifact during my Rooms visit on Tuesday.

The limestone spheres immedietly after carving with the angle grinder and diamond blade.

The same rocks after 36 hours in the rock tumbler.

After the first pass of antiquing. The ball in the foreground is getting close, but I think I may need to tone down the ochre colour in the one in the back.

Photo Credits: Tim Rast

Photo Captions:
Top: The Ivvavik stone ball artifact
Second: My rock tumbler - purchased a couple years back at Toys R Us
Third-Fifth: Stages of stone ball manufacture.
Related Posts with Thumbnails