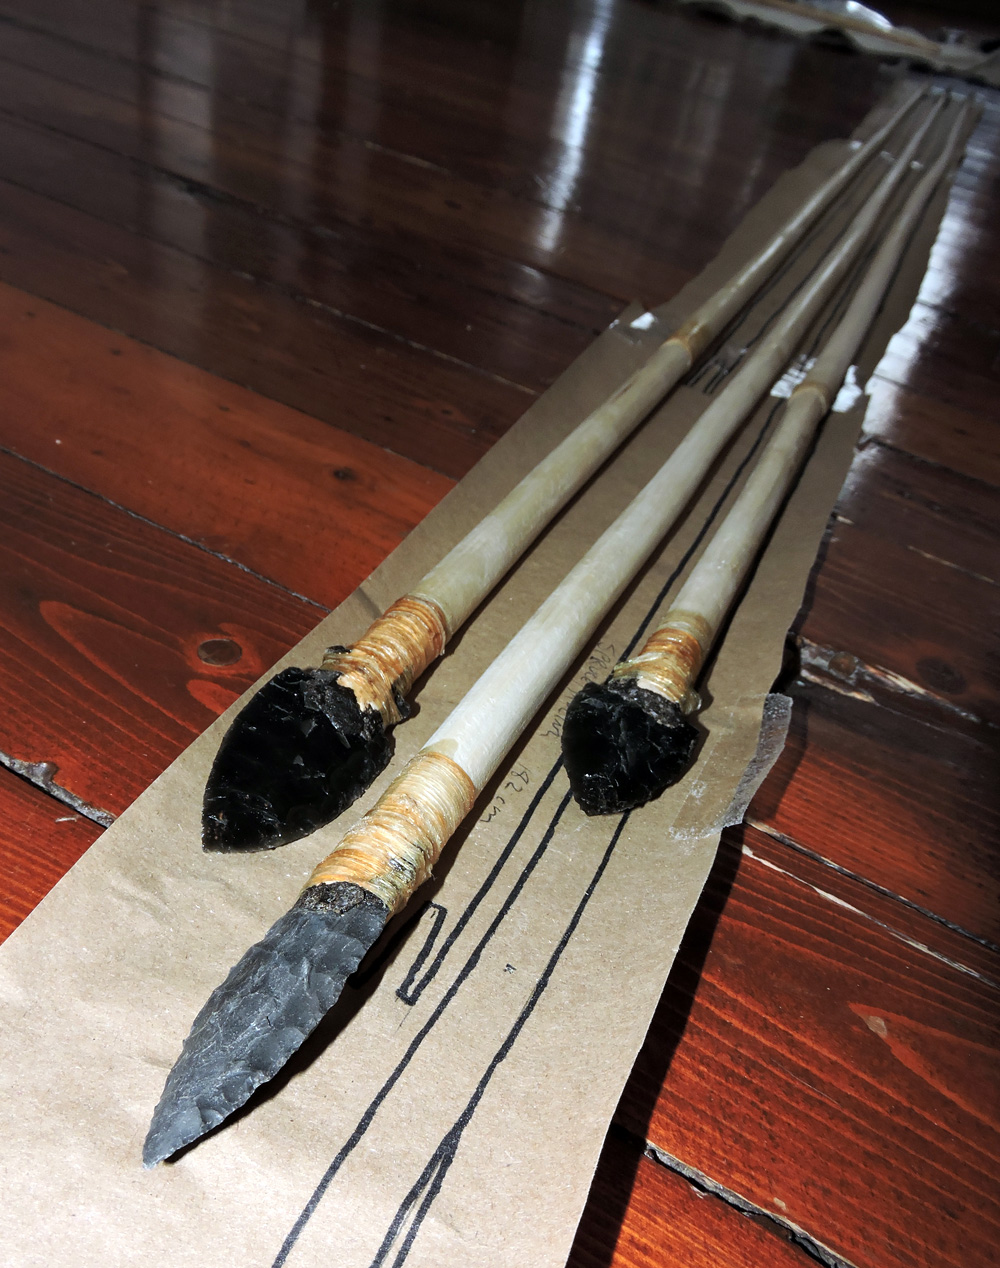
Chert and obisidian atlatl darts representing finds form Ice Patches in the Yukon and Alaska's Northern Archaic
Here's one last look at the Northern Archaic darts heading to Alaska and the Ice Patch dart that is on it's way to the Yukon. This project began several months ago with a request from Jeffrey Rasic with the National Parks Service in Fairbanks, Alaska to make an atlatl and dart set based on artifacts from the area. He sent me some Wiki Peak obsidian to make Northern Archaic (ca. 5000BP) dart points from and put me in touch with Greg Hare in the Yukon to help fill in the blanks with the organic part of the tools.
A simple birch atlatl and the ice patch dart
The ice patch darts recovered by Hare and his colleagues over the past couple of decades served as the models for the dart shafts. That led to adding a direct reproduction of an Ice Patch dart to the order for Hare. Unfortunately, there haven't been any atlatls found in either area for the time periods in question, so we decided that a simple hooked stick would be the safest way to represent that part of the kit. As the order evolved we added a lithic production sequence showing how a dart point would be made from a core of obsidian and a second Northern Archaic dart for one of Rasic's colleagues.
This 4-stage production sequence runs from left to right, with an obsidian primary flake on the left side of the image, through to a bifacially worked blank, a finished projectile point, and the hafted point on the far right. The small flakes between the flake, biface, and projectile point are about 1/10th of the total number of flakes removed to advance the piece to each stage. Conifer pitch, red ochre, and sinew were used to haft the point.
The Northern Archaic darts are hafted with ptarmigan feathers. Modified ptarmigan feathers have been found in ice patches, although it's not clear if they were used as fletching. We decided to use ptarmigan feathers on the darts heading to Alaska because they are from non-migratory birds, which should not have any issues crossing international boundaries.
The Ice Patch dart head is hafted into it's 182 cm long birch shaft with red ochre and spruce gum. The lashing is sinew and hide glue.
The middle dart is the ice patch dart, fletched with duck feathers. According to Hare, there are a couple of different fletching methods found on the ice patch darts. Some use whole feathers with sinew passing through the rachis of the feathers. The earlier darts use split feathers lashed in place with sinew. I used the split feather method, but would love to try sewing the sinew through whole feathers some day. My one regret is that the fletching is relatively short on these darts - around 15 cm long, while Greg Hare told me that at least one of the darts was found with feathers 30-35 cm long. To find feathers that long you'd need to use birds of prey, migratory fowl, or non-local bird species, like turkeys. These darts needed a compromise either in the species used or the size of the fletching and in this case I went with the size of the feather rather than substituting a foreign species. But maybe turkey feathers would create a more accurate looking reproduction. Something to consider for next time.
The Northern Archaic darts were made with foreshafts with a conical insert that fits into a sinew reinforced socket on the main shaft. The design of these forshafts is based on ice patch specimens.
All three darts have a dimple in the end to fit the pointed spur of the atlatl.
The birch atlatls are simple and nondescript. I used the length of my arm from the tip of my outstretched finger to my elbow as a guide for their lengt.
The Northern Archaic darts flank the ice patch dart in the middle. It's hard to photograph these things because they are so long and skinny. The ice patch dart is a one piece dart, without a foreshaft. It's the longer of the three at a little over 185 cm long (6'1" or so).
I finished up those four atlatls that I started on Monday. The bodies of each one is more or less the same, but I played around with different spur and finger loop designs as well as hafting materials. The one that is going to the client in Alberta needed to be fairly robust and suitable for a lot of wear and tear from elementary school children. For that one I went with artificial sinew and epoxy to hold it all together, while I used sinew, gut and hide glue on others.
The one on top is the one that I'm sending to the client. Like the other three, is is made from maple, with a moose antler spur and leather finger loops. The lashing on the spur and finger loops are artificial sinew and epoxy.
Ready for a dart
The only real disappointment is that I probably won't get a chance to play with them at the venue I was testing out. I was hoping that we could include an atlatl toss in an upcoming Newfoundland and Labrador Archaeological Society event, but the field we have available at the venue is a little too cramped to do it safely. The security guard who asked me to stop throwing the darts agreed that it was an unsuitable venue for atlatls. It will have to be another place and time.
I set aside the Beothuk bow project for the day and switched to atlatls and ochre staining. I have a couple quick jobs that I want to finish up before I return to the bow later in the week. One of these atlatls will be going to a client in Alberta, but I'll be hanging on to the others for the time being. I'm hoping that some of these will be used in a public event here in St. John's in a few weeks, but I can't say for certain now. I'll finish a couple with epoxy and artificial sinew to make them a little more durable and weather-proof and the others I'll tie together with gut and hide glue. I'll probably make a stone weight for one or two of them as well.
The four atlatls are all similar designs based on plains atlatls and are all more or less the length of my forearm, from the tip of my fingers to my elbow. They are made from maple, with moose antler spurs. At this point they are roughed out enough that I can duct tape the spurs in place and test them out on darts to make sure that all the spurs work. There is usually a little bit of tweaking to make sure that the spurs stay in contact with the dart for just the right amount of time. Once they are tuned, I'll attach the spurs permanently and add the leather finger loops. When I test the spurs, I'll also be judging the field where the event might take place to make sure its big enough and that there won't be any danger to cars or pedestrians if we go ahead with the toss. I'll let you know how it works out.
After several late winter storms at the end of last week, we finally had a sunny break in the weather today. I used the sunshine as an excuse to get outdoors and collect some branches and spruce resin for this week's hafting workshops. It was a nice excuse to drive around and check out a few paths and trails around the city.
We need some green sticks
This is the third week for the MUNArch flintknapping workshops and we'll be focusing on hafting the stone tools produced in the previous weeks. Its up to the students to decide what sorts of tools they want to make, but I suspect most will make arrow or dart foreshafts or knives. I'll bring a mix of green and seasoned wood to the workshop because some wood is better suited to some jobs than others. At the very least, I'm confident that everyone will be able to use the green boughs to make some Hoko knives.
Bamboo makes a good, quick mainshaft for dart and arrowheads hafted onto a foreshaft.
I don't expect there will be enough time to make arrows or darts complete with mainshafts and fletching, but I think everyone who chooses to make a foreshaft can get one done. Even in an urban environment, with very few woodworking tools, a foreshaft can be turned into a pretty convincing dart or spear by inserting it into a simple bamboo stake from a garden centre. These stakes come in a variety of lengths and diameters, and I use them frequently for the atlatl darts that I play around with. The stakes are hollow and can be trimmed to any length you like using a small handsaw or hacksaw. If you need to expand the hole in the centre of the stake you can whittle it out with a small knife or awl. I usually reinforce the ends with artificial sinew and epoxy, but any sort of string or cord will work. Hemp gives a nice rustic look. If you want to try adding flights to your dart, you can fletch a short length of doweling or a narrow bamboo stake and insert it in the opposite end.
The bamboo can split, so its a good idea to reinforce the end with some sort of wrapping. In this case, I've use artificial sinew, held in place with epoxy.
To finish the dart, a short feathered section can be inserted in the opposite end. If you are in a real hurry, you can make the feathers out of duct tape on a piece of doweling.
The Besant Phase was an interesting time period on the Northern Plains of North America, that began sometime around two thousand years ago and saw the introduction of pottery and the spread of the bow an arrow into the region. The bow and arrow replaced the atlatl during the Besant Phase, with earlier, larger points likely tipping atlatl darts and smaller, later points likely hafted onto arrows. This reproduction is meant to accompany a Northern Plains style atlatl that I made last spring, so it uses a larger Besant projectile point hafted onto a dart shaft.
Straight with real world imperfections
To the best of my knowledge, there haven't been any complete Besant darts recovered, so I used darts found in arid caves in the Great Basin region of the US and on caribou ice patches in northern Canada as my templates. I wanted a fairly light dart, but I could afford to give it a bit of length. The atlatl that it is designed to accompany has a stone weight attached to it, which will help balance a long or heavy dart while in use. I don't have access to the actual atlatl and my atlatls at home don't have weights, so there is a bit of guess work involved, but I think it should be close to being in balance.
The dart is 5 feet long, including the foreshaft, which is approximately 12 inches long. The atlatl in the picture is the same length as the Plains atlatl this dart is designed for, but lacks a weight.
The general shape of the foreshaft and the foreshaft/main shaft socket are based on Great Basin atlatl darts. I used this design because its the same style of foreshaft and socket that I use on my cane darts at home. If the client decides to order additional darts or different point styles mounted in different foreshafts, then I can match them to my darts here in St. John's and be confident that they will fit with this dart in Calgary.
The foreshaft tapers to a simple, conical point that fits into a drilled socket in the mainshaft. Its held in place by friction. The sinew lashing is there to prevent the mainshaft from splitting.
I added sinew over the pitch and ochre
I used darts found on ice patches in the Yukon as my references for the mainshaft and the glue used to attach the point to the foreshaft. I used pitch mixed with red ochre to glue the point into place and to smooth the transition between the stone and the wood foreshaft.
Melting and mixing the ochre and pitch. I wanted to duplicate the ochre staining found in the hafting area of ice patch projectile points and give it a colour and texture that matched the rough and ready feel of many Besant projectile points.
Scarfed join bound with sinew and hide glue
I straightened the the long shoot that I used for the main shaft using dry heat, but there was a sharp kink in the middle that I couldn't work out. It wasn't so severe that it would have had a big impact on the aerodynamics of the dart, but it didn't look very pretty. I cut the shaft at that kink and scarfed it back together. The scarf joint matches the joins found on many of the atlatl darts recovered from the Yukon ice patches.
Most of the other features of the dart are shared between both the Great Basin and the Yukon ice patch archaeological reference darts. They both have shallow sockets at the feathered end of the dart to fit the spur on the atlatl. The feathers are tied fairly close to the socket and the sinew binding serves double duty to attach the feathers and prevent the socket from splitting. I wanted a utilitarian looking dart, with real life wobbles in it so that it doesn't look like it was made on a store bought dowel. I used a long shoot that I found in my wood box. I'm not exactly sure what it is, but willow or lilac are the most likely candidates. I tossed it a few times with a blunt foreshaft just to see how it flies and it works very well. This is intended to be a display piece, but I want it to be a fully functional and as accurate as possible display piece.
I went with dark brown goose feathers for no particular reason, other than I felt they were a complimentary colour to the dark point and bookended the light coloured dart nicely.
Chert point, red ochre and pitch, sinew bindings, poplar foreshaft, wood mainshaft (willow or lilac shoot), goose feathers, , hide glue
This is a reproduction of a Northern Plains atlatl for Mount Royal University in Calgary. This atlatl and a Dorset Palaeoeskimo harpoon will be used as examples of artifacts by anthropology professors in the classroom. The atlatl didn't have to be functional, but a functional reproduction is a more accurate reproduction, so I chose to make something robust enough to stand up to years of wear and tear. Besides, I had a bit of steam to blow off this week, so I spent a couple hours flinging darts around a nearby park to make sure everything worked properly.
It extends the throwers arm
In the above video, I had all of the parts duct taped in place to check that the spur and weight were properly fit. It should give you some idea of how an atlatl works to fire a dart. The atlatl extends a persons arm, greatly increasing the force and distance that they can put behind launching a projectile. This was a major technological innovation over throwing a spear by hand. The technology was phased out with the introduction of the bow and arrow in most places, although it never really disappeared. In was used into historic times in the arctic because it could be operated from a sitting position with one hand, which made it perfect for use in a kayak to launch bird darts or harpoons. Similarly, it was used in Mesoamerica for hunting birds on the water and pinning Spaniards into their armour, when the need arose.
Moving my body weight forward onto my right foot
The throw is fast and overhand
Shoulder, elbow, and wrist all snap forward to launch the dart
The dart should detach smoothly from the spur
Follow-through. On this particular day I was throwing darts about 45-50 metres., which is at least 2 or 3 times farther than I can throw the same darts without the atlatl.
Wedge-shaped antler spur
There are a few perfectly preserved atlatls from arid regions south and west of the Great Plains and from frozen areas to the north, but I'm not aware of any complete preserved atlatls from the Plains themselves. Atlatls are usually composite tools and occasionally the bone or antler spur or the stone weights will be recovered from archaeological sites. I used a fairly simple wedge shaped antler tine for the spur, slightly countersunk into the wood and lashed in place with gut. I used gut for all the lashings because it has a slightly more robust look than sinew and I feel that it works well for archaic reproductions and darts. I didn't have to make any darts for this particular piece, but an atlatl dart is often built like an oversized arrow and since gut has the look of oversized sinew when it dries, I though it would be an appropriate material to use.
The spur fits into a shallow socket or dimple on the base of the dart, which would often be fletched, just like a big arrow.
A stone weight tied to the shaft
The atlatl weight that I used is made from argillite and is an elongated "boat-shaped" form based on weights found in the central and northern plains, as illustrated in Neuman's 1967 American Antiquity article; Atlatl Weights from Certain Sites on the Northern and Central Great Plains. These weights would be tied in place along the body of the atlatl and for a while their function perplexed archaeologists. Some people thought that they might help create momentum, but they didn't seem to improve the range or power of the darts propelled by atlatls. Now, it seems likely that they are there to help balance the system. When the dart is loaded into the atlatl and the hunter holds the atlatl in the ready position, the added weight can help balance the atlatl and dart together. Without a weight, a heavy dart will pull the front of the system down and it becomes very uncomfortable to hold in a short time. Like trying to balance a tray of drinks over your shoulder with all the glasses on one side of the tray. Add a glass or two to the other side and it becomes much easier to hold. There's a really good paper on the subject by Larry Kinsella here. Check out the graphs at the bottom of the page to see the difference in muscle strain that adding a weight to an atlatl makes.
The added stone weight will help balance the system. I'm holding a relatively short dart in this photo, but atlatl darts could be much longer and heavier. Holding this ready position for several minutes while hunting would be much easier if the atlatl and dart were in balance.
Leather finger loops and gut binding
The rest of this particular reproduction is a little more speculative. The length is of an atlatl is often described as the distance from your elbow to the tip of your finger. For the shaft I used tamarack and I wanted a relatively simple stick shape, although I did taper it towards the spur and added slight finger notches. I didn't want it to be too flat or to have a channel, like many southwestern atlatls. For the finger loops I used an old leather knapping pad that was worn soft. The function of the loops is to help grip the atlatl and prevent it from flying away when throwing. I hope the client likes it. This is one of those reproductions that I'm kicking myself for not making two and keeping one for myself.



 PDF
PDF


