Wednesday, December 31, 2014

Happy New Year!

Happy New Year to all you animals out partying like its naught-naught-seventy-nine!
Photo Credits: Tim Rast
(A scene from a wall in Pompeii)

Monday, December 29, 2014

Pondering Drums Again


Dorset Palaeoeskimo drums were a recurring theme for me over the past year and that theme will continue into 2015.  Chris Wolff and I plan to present our research at the Canadian Archaeology Association Conference here in the spring.

Photo Credits: Lori White

Friday, December 26, 2014

The Year in Photos


Google+ made this little film from images that appeared on this blog over the past year.  I enjoyed it.

Wednesday, December 24, 2014

Happy Holidays!

Photo Credits: Tim Rast

Monday, December 22, 2014

Burin-like Tool Progress

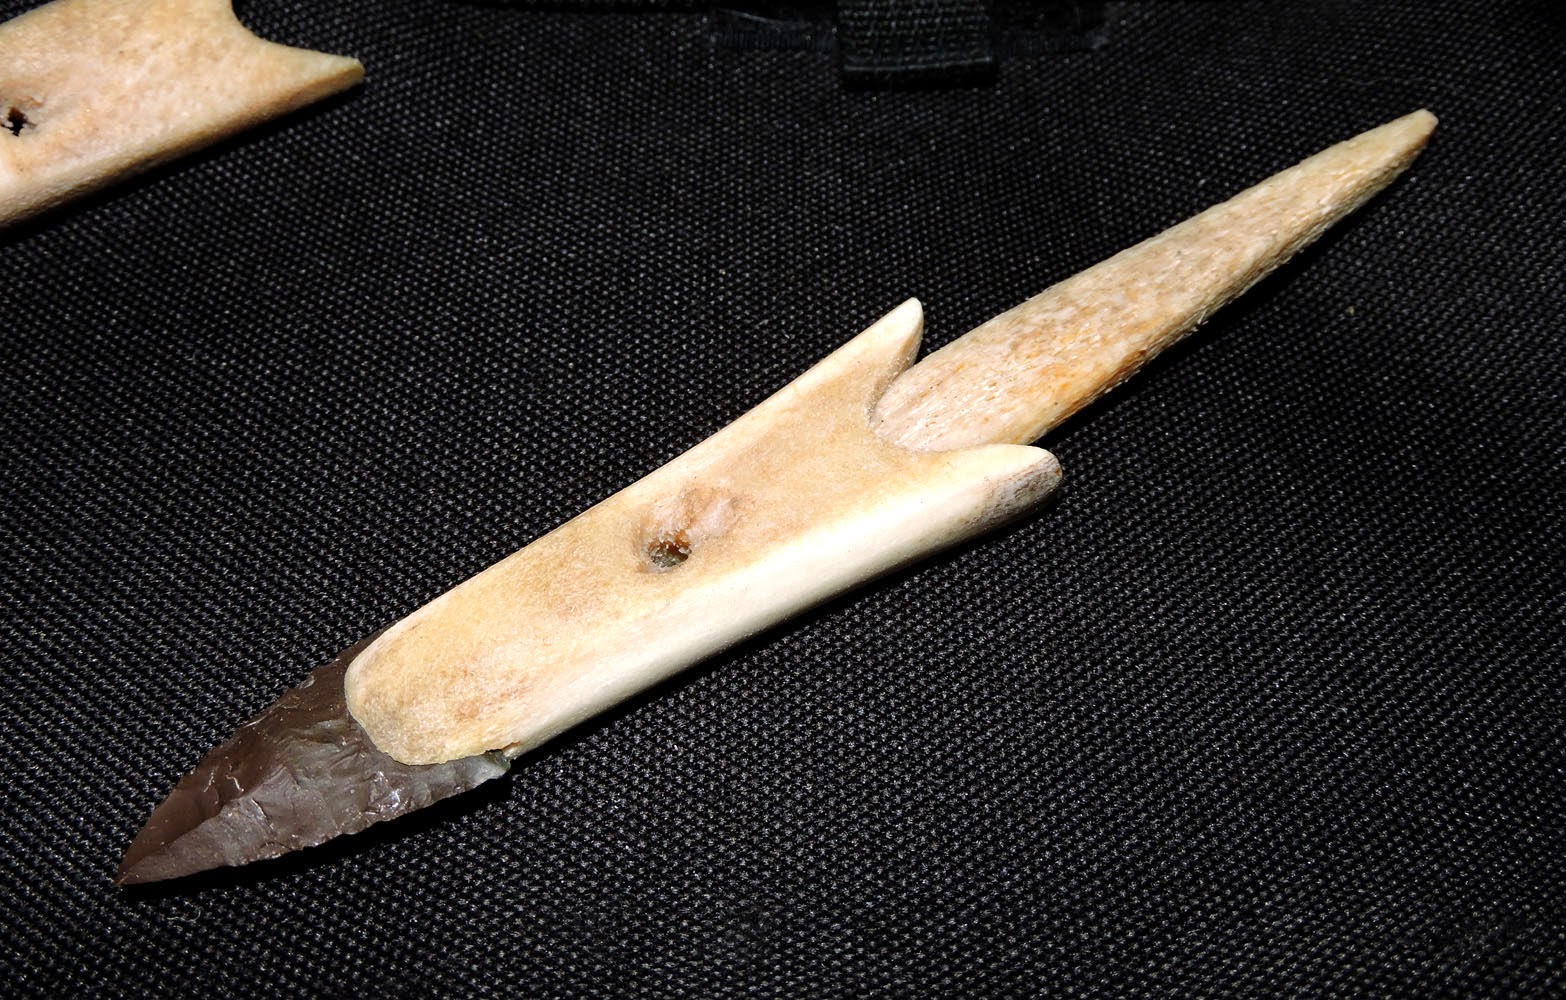
The blade is pretty securely pinched
in the handle even without lashing to
hold it in place.
The hafted burin-like tools are ready for the lashing to go on.  The two part handles create a fairly snug fit on their own.  I'm beginning to see the advantage of this style of handle.  It won't take much sinew cordage to create a secure bond between the small ground nephrite tool blade and the wood handle.  In those rare instances when Palaeoeskimo tools are found with the sinew lashing in place I'm always surprised by how little cordage was actually used.  Three or four loops of twisted sinew is about all you ever see used.  I can see that working here.


I'll probably move on to other tools in the set now that I have these burin-like tools completed to this stage.  There will be several other knives and scrapers that will require lashing and gluing, so it'll be more practical to do them all at once.

Photo Credits: Tim Rast

Friday, December 19, 2014

Hafting Burin-Like Tools the Dorset Way

A nephrite BLT with a bone
 brace in a wood handle
I've enjoyed a few good weeks of making Palaeoeskimo reproductions lately.  Palaeoeskimo artifacts are my favourite.  The streak continues with a set of Dorset Palaeoeskimo hand tools for the Parks Canada interpreters to use in public programming at Port au Choix.  The set includes several hafted burin-like tools (BLT) made from nephrite.  Burin-like tools are small carving or incising tools for working antler, wood, bone, and ivory.  The Dorset used a unique braced handle system for their burin-like tools that is similar to the way they side-hafted microblades, although the brace on the BLT handle actually fits inside a groove in the wood handle so that it functions to help pinch the blade into the socket in a way that the microblade braces do not do.  This is my first time hafting BLTs with this style of handle, so I'm excited to be trying something new.

Realizing that the brace fits inside the wood handle was a bit of an Aha! moment for me.  After that things started to make a bit more sense and everything fell into place.

The notches indicate where sinew
lashing will be wrapped to secure
the parts together
I must admit, I really didn't understand how the brace piece worked on a burin-like tool until I saw a very clearly labelled diagram in Claire Houmard's 2011 thesis on the organic tools from Foxe Basin: CARACTÉRISATION CHRONO-CULTURELLE ET ÉVOLUTION DU PALÉOESQUIMAU DANS LE GOLFE DE FOXE (CANADA).  The thesis is wonderfully illustrated, so even if you don't read French, there is a lot of information contained within it's photos and drawings for you to uncover.  The drawing of the hafted BLT that made everything clear for me is on page 163.  You can also view the artifact through the Canadian Museum of History's online artifact catalog, here.

The Dorset used two part sockets on other tools, like harpoon shafts, knife handles, and microblade handles, but in most other cases that I'm aware of, the two part socket was a quicker, easier way to make a secure enclosed haft.  Remember, the Dorset Palaeoeskimo people didn't use drills, so making a deep narrow socket in a handle would have been very difficult.   Making the sockets in two parts simplified the process in most situations, but this one is different.  It's a more complicated and time consuming solution to the problem of hafting a BLT blade than seems necessary.  I think it must be related to how the tool is used.

The working edges and notches
on Dorset BLTs will be fairly
consistent within an assemblage,
but the bases of the tools will
be much more random.
The nephrite BLT blades that the Dorset Palaeoeskimo folks were making in Newfoundland were ground and polished with a straight edge that could function like a side scraper that came to a sharp point at one corner for grooving and incising.  They were only notched on one side, the same side as the working edge, which implies that the other side was backed into the handle or secured against a brace piece, like the one illustrated in Houmard's thesis.  Brace pieces like this have been found by archaeologists working at Port au Choix and other sites around Newfoundland and Labrador.

 
I need three complete, hafted tools for the order, but I'm making a couple extras for myself and in case something goes wrong. 

Photo Credits: Tim Rast

Wednesday, December 17, 2014

Completed Dorset Harpoon and other Arctic Tools

Arctic artifact reproductions
Here's a final look at the Dorset Palaeoeskimo harpoon that I've been working on for the past few days.  The harpoon, along with a ground slate Thule ulu and an antler, sinew, and copper-tipped Sicco harpoon head is packed and ready to ship to the Department of Anthropology at Trent University in Peterborough, Ontario.  For the harpoon, the endblade, harpoon head, and foreshaft are based on artifacts from the excavations at Port au Choix, while the mainshaft is a spruce version of the Groswater Palaeoeskimo harpoon shaft found in the bog at L'Anse aux Meadows.  Both sites are on Newfoundland's Northern Peninsula.


Dorset Palaeoeskimo sealing harpoon reproduction.  Chert endblade on an antler harpoon head.  The harpoon head fits onto a whalebone foreshaft that is inserted into a spruce mainshaft.  The mainshaft has sealskin lashings.  The harpoon line is sealskin and there is a short braided sinew lanyard fed through the single line hole in the toggling harpoon.

The little Sicco style harpoon head and slate ulu would be at home in a toolkit belonging to the earliest Thule migrants into the Eastern Arctic

You can see the tip-fluting on the chert endblade in this photo and how a thin braided sinew line may have been used to create a secure attachment to the harpoon head.

The ulu is based on an ulu blade with three holes from Labrador that is on display in The Rooms in St. John's.  The original blade is missing it's handle and lashing, so that part of the ulu is based on other Inuit women's knives found in the Eastern Arctic.
 Photo Credits: Tim Rast


Monday, December 15, 2014

The Dorset Harpoon is drying

The harpoon head is secured to the
line now.
All of the pieces of the Middle Dorset Palaeoeskimo sealing harpoon reproduction are assembled.  They need to dry overnight and then I can trim the stray hairs and sinews to make the whole tool look nice and crisp and clean.  I don't plan to do much in the way of antiquing on this piece.  It will be used in a teaching collection and I think the natural wear and tear that it receives over the years will do a good job of building up the appearance of age.

Harpoon pieces: spruce main shaft, antler harpoon head,
chert endblade, sinew lanyard, whalebone foreshaft,
and sealskin line and lashing
It's the braided sinew and sealskin lashings and line that I'm waiting to dry.  I scraped the hair off the sealskin this morning and then soaked it in water for an hour or two to make it flexible enough to work with. The harpoon line is about ten feet of air dried hooded seal skin.   Three narrower two foot long lengths of sealskin are used to lash various components on to the main shaft.  One lashing is used to attached the wedge of wood that closes the socket where the foreshaft is secured on to the end of the shaft and two strips of skin are used to create an attachment point for the harpoon line part way down the spruce shaft.

This is a toggling harpoon head.  Here you can see how it is designed to pivot or toggle sideways when the line goes taught.  The braided sinew lanyard looks a little fuzzy and messy while it is drying.  The loose ends are the ends of individual strands that I fed into the braid as I was making the cord.  They'll get trimmed off tomorrow.
 Photo Credits: Tim Rast


Friday, December 12, 2014

Dorset Harpoon in progress

Not quite everything you need to
harpoon a seal...
I have a Dorset Palaeoeskimo harpoon beginning to take shape.  I had hoped to have it finished by the end of this week, but that didn't happen.  I find tip-fluting the endblade is the trickiest part of making a reproduction of one of these light sealing harpoons and with that difficult bit of knappery done, I hope that the rest of the build should be fairly straightforward.  Unless the client makes a special request, I tend to use the Middle Dorset harpoon heads from Port au Choix as my reference pieces for these harpoons.  In the photo on the right, the reproduction endblade is knapped from Newfoundland chert, the harpoon head is antler and the foreshaft is whalebone.  We have a pretty good idea what these parts of the Dorset harpoon look like because these pieces have a good chance of being preserved archaeologically,  especially the stone endblade.  The rest of the harpoon was likely wood, sinew, and leather and preservation of those parts is much more rare.


The endblade, harpoon head, and foreshaft fit together.  
Tip-fluting is a challenge.  I finally got lucky on the third or fourth attempt on this particular endblade.  The endblades lose a few millimetres of length every time I try and fail to remove the tip-flutes.  Sometimes I run out of endblade and have to start all over again.

Photo Credits: Tim Rast

Wednesday, December 10, 2014

A new little lamp

So far, so good
 I've finished carving a little reproduction of a Dorset Palaeoeskimo soapstone lamp.  While I move on to other projects, I'll spend a few minutes each day layering on grime, oil, soot, and scratches to give it the illusion of age.  The real artifacts will have often have a millimetre or two thick crust of carbonize seal oil caked on them.  In this case, I don't think its necessary to build up a layer that thick, but I would like to discolour the pot appropriately and give it some scrapes and bruises to help simulate age.

Running the pot through a candle flame is a good way to give it a nice black soot staining.  One pass isn't too convincing, but doing this over and over again with layers of oil and scratches from stone tools in between candle licks begins to give the freshly carved soapstone the feeling that its been around a long time and seen a lot of use.
Photo Credits: Tim Rast

Monday, December 8, 2014

Orders in progress


With Christmas deadlines looming, I have a soapstone pot and a Dorset Harpoon on the agenda this week.  Its good to see some pieces heading out the door; the Palaeoeskimo reproduction set that I showed in Friday's post is packed and on its way to MacEwan University in Edmonton.

 Photo Credits: Tim Rast


Friday, December 5, 2014

... and microblades complete the set

I have good luck making
microblades from this jasper.
Microblades are one of the hardest types of reproductions that I make, so the are usually the last thing that I work on when I'm filling orders.  I started working on some jasper microblades yesterday and was able to produce a few individual blades that I can use in hafting projects, but no nice blade and core sets.  When I'm making a core and blade set, I really like to have a run of successful blades that can be refit onto the core.  I finally got those blades made today.  When it is working, the blades should get straighter and more regular as the blade removal process goes on.  The photo on the right shows the last three blades in the series.  Even without any trimming they have nice parallel sides and one or two long straight ridges or arrises running down their length.

Here is the sequence of blades as they came off the core from left to right.  You can see how they gradually become flatter and more regular with straighter edges as the core is reduced.

Looking down on the refit microblades from the top of the core.  The gaps that you can see between each blade is a result of all the platform preparation necessary to isolate each microblade platform before they are struck off the core using an antler soft hammer.

The complete set, signed, and ready to pack up.  On the left is a Maritime Archaic adze and the rest of the tools are Palaeoeskimo reproductions. The reddish orange pieces are the microblades and core.  The middle columns are side scrapers on the left and end scrapers on the right.  The flat slate tool with the two holes in it on the right is a lance head.

Photo Credits: Tim Rast

Wednesday, December 3, 2014

Palaeoeskimo Scraper Sampler

A pile of reproduction scrapers
I need an assortment of Palaeoeskimo scrapers for a couple ongoing orders.  Here's a look at some of the chert side scrapers and end scrapers that I have made, so far.  A portion of this collection will be sent off as is, while others will be hafted into handles for the client.  Like the original tools, these reproductions are generally made unifacially on flakes of chert.  They are designed to be hafted into handles and while there was usually an effort made to maintain a purely unifacially worked scraping edge, the hafting area of these tools often show bifacial retouch to help shape the flake to fit into the socket of a handle.  The handles took many forms, but among the Palaeoeskimo cultures, they were usually open sockets and the stone was hafted with the flat ventral surface of the flake mounted facing away from the handle.

Assorted side scrapers


Groswater Palaeoeskimo end scrapers.  Usually we find the little used up scrapers with their distinctive ears, like the one on the right, but when they were first made they would have had a longer, wider body like the one on the left.  As they are used, blunted, resharpened, and used again, that wide body is worn back towards the handle and the ears form just at the point that the stone tool is ready to be discarded.

Mixed Palaeoeskimo side scrapers and end scrapers.


Monday, December 1, 2014

A Wintry Weekend

First snow in Quidi Vidi
We had our first brush with winter here in St. John's over the weekend.  Last winter we had a pretty amazing run of snowy Friday nights and clear blue skied weekends that were perfect for getting out and snowshoeing and generally enjoying the season.  This weekend seemed to pick up right where last winter left off.  Lori and I got out an about around town and headed into the woods to pick up a Christmas tree. 


Quidi Vidi

On Sunday, we went out Christmas tree hunting.

Usually, we try to escape Christmas and go to a cabin or somewhere warm, but this year we're embracing it.

Cutting a harpoon shaft, err... Christmas tree

I think this is how Dexter got his start.

More Quidi Vidi.  I suppose I should mention that we didn't harvest our tree in Quidi Vidi - this was a different trip.

Photo Credits: Tim Rast

Friday, November 28, 2014

New Adze Blade Reproduction

Reproduction adze: the bit is on the right end in the photo
Fresh from the workshop - a new ground slate adze head reproduction.  This is a five inch chipped, pecked, ground, and polished piece destined for a university teaching collection.  I've been working on this set for a while - hopefully I can get the rest of the pieces finished up and sent off next week.  The style of this adze is based on Maritime Archaic artifacts from Newfoundland and Labrador.  It's generally rectangular in cross section, with a slight taper towards the end opposite the cutting bit, so that it would be wedged more tightly into the adze handle and lashings as it it used.


I used a local reddish purple slate for the adze.  I like to find a piece of stone that is already close to the dimensions of the desired end product, so that I have a minimal amount of trimming to do with the hammerstone as I rough out the blank.  Although, I do like having a few big flake scars visible on the finished tool, so that you can see the processes involved in manufacturing these tools.  Those chips help make it look more like the original artifacts as well.  After chipping the rough blank,  I'll start pecking the blank with a hammerstone as early as possible to get rid of rough edges and start smoothing the freshly fractured stone.  If the piece isn't solid, I want to know that early in the process.  Usually if something like this is going to break, it happens when you are hitting it with another rock. during the early chipping and pecking stages. 


As the adze blade starts to take shape there is less chipping and pecking done, and more grinding and polishing.  Most of the effort goes into shaping the polished bit.  On an adze, you want a beveled edge close to one face, rather than having the edge lined up symmetrically down the middle, like an axe head.
Photo Credits: Tim Rast

Wednesday, November 26, 2014

A good long day

It was a busy day of busy work.  We had a new washer and dryer set delivered to the house after the transmission went in the old washing machine and covered a load of white laundry with little black grease spots.  The delivery could have meant hours of hanging around and waiting for the Sears truck., but luckily we were one of the first on the list, so after dismantling and remantling the patio door, basement, and laundry room I still had enough time in the day to get an Elfshot order in the mail.  The evening was fun, too.  Lori and I got to hang out with the new Newfoundland and Labrador Archaeological Society Executive Committee at our old pub for the first NLAS exec meeting of the 2014/2015 year.
Photo Credits: Tim Rast

Monday, November 24, 2014

Another day in the workshop

Palaeoeskimo scraper reproduction in Newfoundland chert
Another day in the workshop is gone.  I've been plugging away at a few simple Palaeoeskimo tools to try to get back into the rhythm of knapping.  Its been so long since I've knapped at production volumes, that I need to turn the blisters on my hands back into calluses.  I spent most of the afternoon preparing tools and materials for an Open Minds session tomorrow.  I'll be helping grade 5 students make ground slate tools at The Rooms for the next three Tuesdays.  I need about a half day worth of preparation time ahead of the half day workshop.  Usually, I do the preparation the day before the workshop, so it always feels like an Open Minds session occupies two days of my work week.  Instead of waiting until next Monday, I'm going to try preparing my kit for next Tuesday when I get home from The Rooms tomorrow afternoon.  If I can get into the routine of finishing an Open Minds day with a fully stocked and ready to go kit, then future sessions should only feel like one day away from my regular workshop schedule, rather than two days.   

I don't think I showed this photo yet.  This the completed obsidian necklace that I was hafting last week.  Right now it's bound for Australia.
Photo Credit: Tim Rast

Friday, November 21, 2014

Finished Ivory Polar Bear Head Pendants

Dorset Palaeoeskimo Bear
Head Reproductions
I finished the polar bear head amulets that I was working on and have them strung on to simple black leather cords.  Walrus tusks can have natural cracks running their length that are dark brown or black at the surface but that warm to a honey or caramel colour on the inside before they vanish.  The surface of the first two carvings that I worked on had these dark bands running lengthwise along the heads and  I wasn't sure if the client would like the look or not, so I made a third one to give a nice clean, white option.  All three heads are based on Dorset Palaeoeskimo artifacts found in the High Arctic and Newfoundland and Labrador between about 2000 and 1000 years ago.  I purchased the ivory that I used here from the Co-Op in Cape Dorset, Nunavut.

The head on the left is based on artifacts from Newfoundland and Labrador, while the head on the right are based on Dorset Palaeoeskimo bear head carvings from the High Arctic.  The High Arctic versions are more anatomically natural carvings, with more detailed musculature on the head and muzzles, with more detailed noses and mouths.  The Newfoundland and Labrador version is relatively natural looking for this province, but by comparison, it is still a more stylized form emphasizing the silhouette of the bear head over anatomical accuracy.  

The underside of the bears differ as well.  The original Dorset Palaeoeskimo bear heads were often carved with suspension holes or holes running from their mouths down their throats.  The two smaller carvings here have simple holes carved at the base of the head and the original artifacts were likely suspended from a cord, much like these necklaces.  The larger head in the lower right corner of this photo is based on the Newfounldand and Labrador artifacts that have the linear channel running the length of the head, with one hole in the mouth and one hole in the throat.  If a cord was threaded through them originally, then it seems like it was probably running lengthwise through the head, rather than suspended at one end as shown here.

Three little bears.  I have my favourite, but they all turned out well. I have a lot of respect for the Dorset Palaeoeskimo crafts-people who made the originals with stone tools.
Photo Credits: Tim Rast


Related Posts with Thumbnails