Friday, April 30, 2010

L'Anse aux Meadows Harpoon - First Impressions

It was like Christmas morning in the vault!
I've been making Palaeoeskimo reproductions for 15 years and harpoons for at least a decade, but yesterday was the first time that I ever held a complete wood mainshaft from a Palaeoeskimo harpoon.  Its not that I haven't been trying to do a good job - its just that they are so rare.  This one is a Groswater Palaeoeskimo harpoon and although it was excavated in the 1970s, I'm not sure if anyone really remembered that it existed or appreciated what it was before Jenneth Curtis pulled it out of Parks Canada storage in Dartmouth this winter.  Its an amazing and unique artifact.  The tamarack shaft was found in a bog at L'Anse aux Meadows with other wood working fragments and was radiocarbon dated to 2970+/-110BP.

The Groswater Harpoon shaft
It's 121 cm long, nearly perfectly straight, and 23-24mm square along its entire length.  It is extremely well preserved with tool marks and construction details frozen in the wood like they were put there yesterday.  There were details on it that I couldn't have guessed at, like a recessed area that was likely designed to help secure the harpoon line to the main shaft and a tapered "scarf" joint at the butt end that I think indicates an ice pick was hafted to the end.  It was also gratifying that some aspects of the construction that I'd only guessed at before were preserved there in full colour - like the combination scarfed and gouged foreshaft socket.  In the photo on the left you can see those three features.  The scarfed and gouged foreshaft socket is in the foreground, the recessed section is along the shaft opposite the pencil and the taper at the far end is the long scarfed surface that may have been secured to an ice pick.  The mock-up below shows the shaft from the side and a sketch of how I think all the missing pieces would fit together.

This artifact is going to change how I make Groswater Palaeoeskimo harpoons


Can you see the 2900 year old cut marks?
The best part is that I get to bring this artifact to life over the next few weeks by building a reproduction that will go on display in the expanded Parks Canada Interpretation Centre at L'Anse aux Meadows.  The focal point for L'Anse aux Meadows is the 1000 year old Norse settlement that was discovered 50 years ago this year by researchers following maps and sagas to Vinland.  However, there were other people living there before and after the Vikings came and the story of the Aboriginal inhabitants of the area will be expanded in the new exhibits.  The reproductions that I'm working on span the Palaeoeskimo time period, including both the Groswater and Dorset Palaeoeskimo.

Scarfed and gouged socket (look how straight it is!)
The set includes 4 pieces - a knife, a scraper, an adze, and the harpoon - and the goal will be to reconstruct them as they would have appeared when new. The completed pieces will be similar to the Wapusk artifact reproductions. In fact, in a cool coincidence, the 2900 year old harpoon is exactly the same age as the Seahorse Gully artifacts from Manitoba that I based the Wapusk harpoon on. Even though these two sites are separated by about 2000 km, the similarities are remarkable. They could have fit together like two pieces of the same puzzle.  The scarfed and gouged socket that I used on the Wapusk harpoon (inset with black background on the right) is exactly the style of socket preserved on the L'Anse aux Meadows Groswater harpoon.

Photo Credits: Tim Rast

Wednesday, April 28, 2010

Cupids Arrow

Cupids Arrow and Arrowheads
No really, it is.  I'm shipping an order to the museum gift shop in Cupids today and it literally includes an arrow.  There's an untapped marketing opportunity there, for sure.  For the time being, if you visit the archaeological site in Cupids or take part in any of the Cupids 400 celebrations this year, pop into the gift shop for the biggest selection of Elfshot Recent Indian necklaces, earrings, and tie tacks in English speaking Canada.


Prince Charles and Archaeologist Bill Gilbert
Cupids is having a pretty big year this year.  The town was established in 1610, which makes it 400 years old in 2010.  Its the oldest English community in Canada and the archaeological site and museum have been the epicentre of some pretty high profile celebrations and visitors lately. In November, The Prince of Wales stopped by for a look and the Premier and Prime Minister stopped bickering long enough to show up with some funding and kind words for the celebration along the way. 
Our Premier and Prime Minister, too
Its a great boost for the community and its pretty exciting to see people stand up and take notice of an archaeological site.  Bill Gilbert has done a great job of searching out the origins of this community and the surrounding area.  His research into the area has not only pinpointed the location of the earliest English settlement, but he's also been able to locate some of the Beothuk sites that the 17th Century inhabitants recorded in their letters and journals.

Finally, speaking of historical archaeology-loving, arrow-wielding cherubs - Steve mentioned his shadow-boxed Beothuk arrow reproduction in the comments of Monday's post.  I wish I had one of these, I love the look of it in the frame. Thanks for the photo, Steve!

Steve's Beothuk arrow reproduction tricked out in an after market shadow-box


Photo Credits:
1: Tim Rast
2: CBC
3: CBC with some slight editing by me
4: Steve Hull

Monday, April 26, 2010

Making Beothuk Arrows

Beothuk Arrow Reproductions
Arrows played a significant role in the lives of the Beothuk. Beyond their function in hunting game for food, clothing, tools, and shelter the Beothuk believed that the first men and women were created from arrows stuck in the ground, and arrows were often included as grave goods in burials.

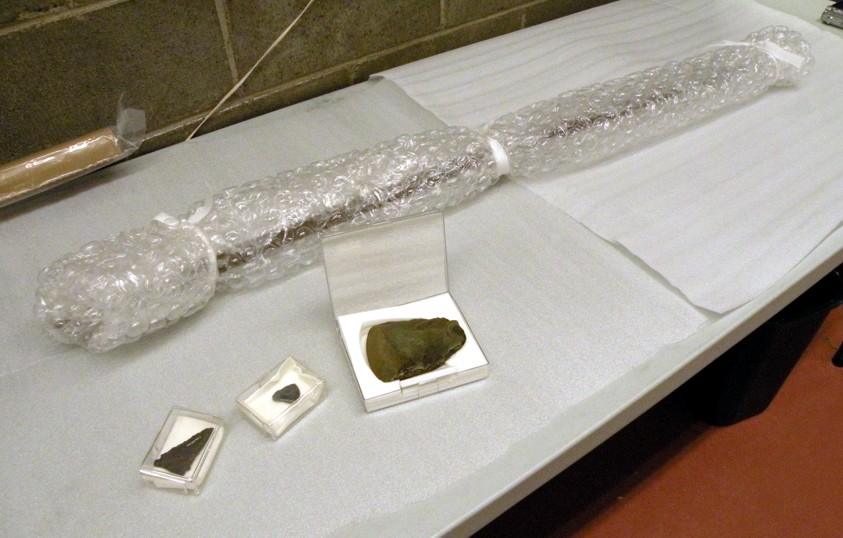
Recent Indian Points
Over the years there have been hundreds of stone arrowheads found at Recent Indian sites on the Island of Newfoundland, but we don't have much direct evidence of what Beothuk arrows looked like.  There were a few fragments collected and photographed over 100 years ago, but as far as I can tell, these artifacts aren't in the Province anymore.  They are not in the Archaeology Collection at The Rooms, which means that they might have found their way into a museum somewhere else in Canada or perhaps the UK.

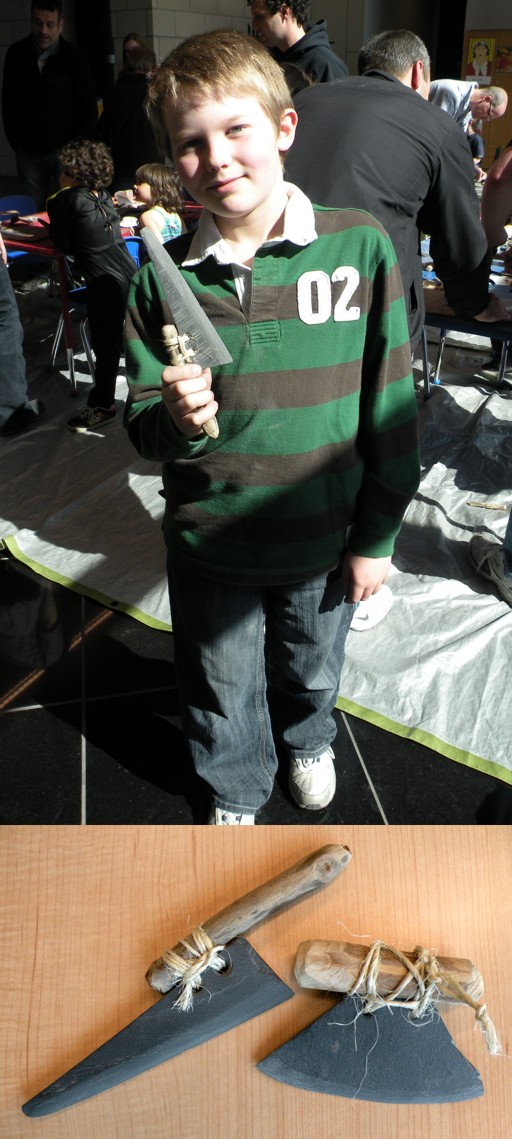
#2s are arrows, #4s are kids arrows
 The Beothuk arrow reproductions that I make are based on the archaeologically recovered chert arrowheads, the photo of the arrow and bow parts in James P. Howley's 1915 book; The Beothucks or Red Indians: The Aboriginal Inhabitants of Newfoundland and the additional written descriptions collected in Howley's book. Although no complete arrows survive there are several first hand accounts made by Europeans who saw them. 

Planing down the pine shaft
They are described as being a yard long, or the distance from the center of the chest to the tip of an outstretched fingertips, which approximates the length of the draw on the bow. The shaft is pine and they were always fletched with two strips of goose feathers. I start with straight grained pine board and cut it or split it into square dowels about 3/4 of an inch wide that I then plane down using a small Stanley plane.

Big nocks for big string
Based on the photos, the arrows taper towards the arrowhead and have a V-shaped or U-shaped nock cut into the opposite end.  The arrow appears to widen into a slight flare around the nock, although it also looks like they are thinned flatly into a rectangular cross-section.  This creates a wide strong nock and it also creates two convenient flat facets to tie the feathers to.  The nock is larger than on modern arrows because the sinew bow strings available to the Beothuks would have been much thicker than today's commercially made bowstrings. 

Feathers create drag and spin
I use two Canada Goose feathers from the same wing so that when they are split and tied to the shaft they spiral in the same direction and help spin the arrow while in flight.  A spinning projectile travels truer than one that flies flatly - its the same idea as putting rifling inside a gun barrel.  The historic accounts all agree on the number of feathers (two) and the type (goose), but they don't offer a lot of detail on the specifics of how the feathers are cut or glued to the shaft.

Map detail of Beothuk bow and Arrows
There is a small drawing of a Beothuk bow and arrows in the legend of a map of the Exploits River completed by John Cartwright in 1773 maps that I use as a reference for the feathers.  The arrows depicted in the drawing are tipped with iron points and have relatively long strips of close cropped feathers.  I doubt that the bows changed much with the introduction of iron to the Beothuk toolkit, but I often wonder how different the arrows tipped with iron heads would have been from the arrows tipped with stone.
Two long thin strips of goose feathers
Sometimes I play around with different styles of feathers on the arrows, just to remind myself that the fletching that suits the larger iron arrowheads may not have been the best for lighter stone points that preceded them. 

Tying on the feathers
I use sinew and hide glue for the binding materials for both the arrowhead and the feathers. Pine pitch is an option and is quite common on Innu tools from Labrador.  I'm sure that it was known to the Beothuks, but I'm not aware of any direct evidence of pitch glue on any of their artifacts and its not mentioned in the historic texts.  Although under a coating of red ochre, the pitch wouldn't be very noticeable, which is how the Beothuk finished all of their posessions.  I stain the arrows with a red ochre, linseed oil, egg and water mixture.  I want to experiment in the future with substituting caribou grease and seal oil for the linseed oil.

Complete Beothuk arrow reproduction


Photo Credits:
1,2 4-6, 7, 8:Tim Rast
3: Plate from Howley 1915 from NF Heritage Website
9: Eric Walsh

Friday, April 23, 2010

Knapping like a Rhino

Recent Indian points, detail of rhino
Its been a pretty repetitive few days of knapping Recent Indian points.  I put in a long day yesterday to finish up the points that I need to fill all of the Recent Indian jewelry in this spring's wholesale orders.  I knapped 50 points from core to flake to blank to corner-notched and signed point in about 3 days.  Its a nice round number, so maybe its worth keeping track of it.  I suppose that the time was broken down something like this:
  • 1/2 day making flakes from cores and bifacial cores - percussion
  • 1 1/2 days knapping blanks - mostly pressure, some percussion
  • 1 day finishing and notching blanks - pressure flaking
I promised myself that if I got all the points finished before Friday morning I could make them into a rhino.  There are 17 small points included from last week's knapping for a total of 67 points.  Sixty-six in the rhino and one in the tick bird.

Temporary rhino mosaic made from Little Passage and Beothuk Recent Indian points

Detail of Burial 34 by Lori White
Other than the rhino mosaic, I was also trying to plow through all the knapping that I would need to do so that I could have a stretch of non-knapping days to give my shoulder a break.  Pressure flaking big batches of chert points in the spring plays havoc on my left shoulder.  I have a truckload of tricks to help with the soreness including ice, pressure, Ibuprofen, exercise and knapping with an Ishi stick, but one numb shoulder has just become part of my knapping routine.  The most annoying part is that its not a common knapping injury, most other knappers that I've talked to who experience joint pain have it lower in their arms, in the wrist or elbow.  I can't even console myself with the thought that I'm building a useful comparitive skeleton for later study, its too atypical.

Photo Credits: Tim Rast

Wednesday, April 21, 2010

Flintknapper Sees Light in Tunnel

Making blanks, déjà vu
Today's work schedule is pretty much exactly the same as last Wednesday.  I'm making blanks for Recent Indian arrowheads to make into hafted necklaces.  Although I did get some good news yesterday -  I heard through the grapevine that some fun artifacts are en route to St. John's to be reproduced, so there's a bit of a light at the end of the tunnel.

Is the rain, drizzle, and fog helping?
Filling the wholesale orders are still my priority for the next month or so, but these incoming artifacts should help break up the monotony of the assembly line.  They are Palaeoeskimo tools from Newfoundland's Northern Peninsula and if the sealskin cooperates, there will be opportunities with this project to use some of the hooded sealskin thong.  For the first couple of months the reproductions will not only look authentic, but they should smell authentic!  I'll get into more specifics when I've seen the artifacts and I'm sure that I have permission to blog about the work.

Points and pins drying
In the meantime, the batch of Recent Indian (Beothuk) points that I started last week have been cut, drilled and ochred.  We don't have great drying weather in St. John's right now so I moved these into the basement to help speed things up.  Once they are dry I can string them, card them and ship them.

I like how the ochre antiques the point - even new they look old
 Photo Credits: Tim Rast

Monday, April 19, 2010

Ashes and Hooded Seal Outtake

I call the little one "Bieber"
What a strange morning here.  Apparently the airport is closed because of the ash cloud drifting westward from the Iceland volcano.  I went outside to see what its like and its raining and foggy.  I couldn't smell any brimstone.  Actually the air smells really fresh - I suppose that with the water filtering through the ash its kind of like living inside a giant Brita water filter. The photo on the right shows what the air looks like this morning.  The arrowheads look like little jet planes yearning to escape into the air, but they can't because they are tied down.  Each stone represents a stranded Juno pop star, waiting to fly out of St. John's.

Recent Indian points
I'm still plugging away on the wholesale orders.  I have a batch of hafted necklaces on the stalks, ready to be trimmed, drilled, and ochred.

The hooded seal project got another nice mention on Time Machine by Heather Pringle in a post called Bravo to Archaeologists who Brave the Blogosphere.  While Working on the seal, Lori and I took a tonne of photos and videos.  Some were too weird to use right away.  Like this one of Lori inflating a 35 foot long section of seal intestine with the mattress pump.  You'll want to have the sound on to really appreciate it:


Photo Credits: Tim Rast

Friday, April 16, 2010

Rocks and Rockers

Great White Chert Shark
Since the last post, I finished notching 37 Recent Indian corner notched points.  Here's a picture of them shaped like a shark.  Its a great white shark.

The White Stripes: Under Great White Northern LightsWhich reminds me of The White Stripes: Under Great White Northern Lights.  If you haven't heard this album or seen the accompanying documentary of their cross Canada tour in 2007, then you are sadly missing out.  Lori and I went to their concert when they were here in St. John's and it was amazing.  The DVD captures alot of the magic of that show.

Which reminds me of The Novaks, who opened for them while they were here.  The Novaks are releasing a new EP, Big World, on April 20th.  In the meantime you can listen to the new tracks streaming online.  I think Sooner or Later is my favourite new track.


Great White Red Shed
Which reminds me that I should get back to work, because Janet Davis, the big sister of The Novaks' vocalist, Mick Davis, is waiting on her wholesale jewelry order of Recent Indian necklaces for Norton's Cove Studio.  Which means that I have to disassemble the shark and head out into the great white north - it actually snowed in St. John's overnight and this is what my workshop looks like this morning.  Which makes me think of how nice Canada's west coast would be.

Disassembling sea creatures and thinking about the west coast reminds me of a really cool write-up this morning at Northwest Coast Archaeology called No Guts No Glory which explores some of the wonders of inflated seal intestines and the parallels between the archaeology of Canada's Pacific and Atlantic coasts.... and Elfshot.


Photo Credits:
1,4: Tim Rast
2: Amazon.com
3: The Novaks
5: Northwest Coast Archaeology

Wednesday, April 14, 2010

Knapping Blanks

Will the seal grease ever dry?
I'm still working on filling wholesale orders.  The hafted Beothuk necklaces turned out to be really popular at the wholesale show, so almost everything that I have to make until the middle of May are corner-notched Recent Indian points.

Recent Indian arrowhead blanks
I have about 100 Recent Indian points to make in total - most of them will be made into hafted Beothuk necklaces, but some will be used on arrows and others will be used on necklaces, earrings, and tie tacks.  On big bunches of points like this, I like to work in an assembly line.  I spent a few hours making a big pile of flakes to knap into blanks.

A big pile of flakes to work through
I'll work on blanks for the rest of the day.  Blanks are roughly formed tools that could be finished in a number of different ways.  In this case, the blanks I want are small triangular bifaces to be corner-notched into Recent Indian arrowheads.  Tomorrow, I'll finish and notch all of the blanks that I have prepared by the end of the day and then on Friday I'll assemble the hafted arrowhead necklaces.  I should be able to get enough made to fill the first two or three orders on my schedule.

A bit of company
Its pretty repetitive, mind-numbing work.  I have a dusty little radio to help pass the time.

Photo Credits: Tim Rast

Monday, April 12, 2010

Ground Stone Family Fun Day

Drilling through slate
Lori and I had a great time at The Rooms yesterday helping kids make ground slate ulus, Thule men's knives and soapstone carvings.  I'm not sure exactly how many people we saw, but I think we had at least 30 or 40 kids and 15 or 20 parents drop by.

Dad's were a big help
For the older kids we had slate blanks and wood handles prepared ahead of time that kids could file, drill, and tie together.  We used bow drills to make the lashing holes in the stone, which was great fun for the dads.  We'll have to keep this program in mind for Father's Day.  

Bow drill and examples that I prepared ahead of time
 Here's a quick clip of the bow drill in action - it can get pretty hot!


Soapstone Plummet
For the younger kids, we had a couple tables of soapstone that they could try carving.  We had a few examples of soapstone artifact reproductions, like a soapstone plummet and some animal carvings, but like Lori said this was more of an "Imagination Table", where kids could experiment and play freely with carving the soft rocks.

Soapstone carving at the Imagination Table
Great Job!
I think everyone was able to take away a project at the end of the day.  It was nice to have an activity that kids could get involved with and dirty.  Flintknapping glass or stone is just a little too sharp for big groups of young kids to attempt in a hands-on way, but the ground stone carving is much safer.  Its perfect for older elementary school age kids.  Its an especially good fit for the grade 5 curriculum in Newfoundland and Labrador.
Frederick and his amazing knives!

Photo Credits: Tim Rast

Friday, April 9, 2010

Salty Guts and Books

Demo for the Historic Sites Association
On Wednesday evening, I did a flintknapping demonstration for the shop managers from the Heritage Shops across the island.  It was a good chance to talk to the front line staff selling my products and get feedback from them on what they like and don't like about the product.  I think the demo also helped them understand exactly how a flintknapped arrowhead is made and will help them explain the product to customers.

Today, I'm getting ready for the ground stone Family Fun Program at The Rooms, which takes place this Sunday from 2-4 pm.  Yesterday, I spent a bit of time knapping, received a couple buckets of rhyolite to use for some exclusive products for the Burnside Heritage Foundation, and hung the hooded seal guts out to dry in the sun.

Salt crystals forming on the bladder
On Wednesday, I noticed some white patches had started to form on the bladder and intestines and my first concern was mold, but they were just salt patches that formed from soaking them in salt water before inflating them.  I wiped them off with a damp rag.  While they were strung up I peeled off some of the dried connector tissue.  It was flaking off like paper at first, but in one spot it tore the intestine.

Tear in the drying intestine
The gut is more fragile than I had thought.  It looks a little like flypaper, but it seems about as strong as heavy tissue paper.  I thought it might be fragile because of something I read about drying the intestines in the warm summer sun, but I didn't expect them to tear quite this easily.  I'll have to keep that in mind for whatever project I wind up using them on.

 There's a passage in Arctic Clothing of North America - Alaska, Canada, Greenland that explains what's going on:

stretched gut
85 feet of seal intestine out to dry
Women prepared the intestine by washing and soaking it for several days, scraping the inner and outer surfaces, then stretching and inflating the intestine and letting it dry....  The drying process was accomplished in one of two ways.  In the northern regions, especially on St. Lawrence Island, the intestine was allowed to dry in cold, dark, windy weather for a considerable amount of time. This would cause the intestine to turn white. Intestine prepared in this manner was often referred to as 'bleached gut' or 'winter gut', and was very flexible and durable.  The intestine tubing was then cut lengthwise and opened out to form long narrow bands. These bands of intestine were then stitched together horizontally or vertically to create a parka....  In Southwestern Alaska... Preparation of the intestine was the same as in the northern region, but because of the less harsh weather with more daylight and warmer temperatures the intestine turned yellow in colour, and was thus referred to as 'summer gut'.  When dry the summer gut parka was less flexible and would tear easily.  But when wet, the gut would become soft and flexible and conform to the wearer's body.


Seal gut parka in Homer, Alaska
It sounds like I'm making 'summer gut'.  There are a few interesting images around the web of gut parka's.  Heather Pringle wrote about our work with the intestines last week and has a few nice images on her blog: What to Wear on an Ice-Age Sea Voyage.   And Travis Shinabarger has an amazing flickr photostream of seal gut parkas in museums in Alaska.

Disclosure:  I try to reference the books that I quote on this blog by linking to a site with more information on that particular book.  Often that ends up being a bookseller like Chapters or Amazon.  This week I enrolled in the Amazon Associates program, so in future blog posts, if you follow a link to a book that I reference and wind up purchasing it, then I get a percentage (6%, I think) of the purchase price for the referral.

When I'm writing a new post there is a little window next to the editor that lets me search Amazon and make easy links in the blog.  They can be normal looking text links like this to the Handbook of North American Indians, Volume 5: Arctic, individual photos, or text boxes with an image (below).  I'll probably use all three from time to time, so I just wanted readers to be aware of this change.

Netsilik Eskimo


Photo Credits:
1: Andrea MacDonald
2-5: Tim Rast
6: Travis Shinabarger
7,8: images from Amazon.com
Related Posts with Thumbnails