Friday, October 30, 2009

Craft Fair Obsidian

The 2009 Fine Craft and Design Fair at the Arts and Culture Centre in St. John's starts next week. The fair is 10 days long this year with a switch over in booths after five days. I'm participating in the second half of the fair so I have just under 2 weeks prep time left.

I've been working on larger one of a kind pieces, like harpoons, knives and Lost Stone necklaces this week. They aren't the sort of pieces that I like to be working on at the last minute and if something goes wrong I want as much time as possible to fix them. In the next couple of days I'll switch to smaller jewelry. If there are colours or materials that you'd like to see at the fair let me know ASAP and I'll be sure to have some on hand.

Here's a peak at the knives while the sinew is drying and the Lost Stone necklaces before they are strung. I've had these knife blades around since at least last spring, but I just got around to making handles for them this week. There are a couple maple handles in there from some left over hardwood flooring at Lori's parent's cabin, a couple pieces of yew from this summer's bows and a couple moose antler handles. I don't think I've used any of these materials in knife handles before so the fair will be a chance to see which materials and styles appeal to people. I like the moose antler tines more than I was expecting.

The Lost Stone necklaces are different every time. It looks like I'll only have 6 ready for the fair, so if they appeal to you come see me early between November 11-15th. Parking and Admission are free this year so you can come check out the show as many times as you'd like!

Photo Credits: Tim Rast

Photo Captions:
Top: An Obsidian Lost Stone Necklace waiting to be strung
Second: Detail of the most recent batch of Obsidian Knives
Third: Obsidian Knives for the 2009 Fine Craft and Design Fair
Fourth: Obsidian Lost Stone Necklaces ready to string

Wednesday, October 28, 2009

Ivvavik, Aulavik, and Tuktut Nogait Recap

This is the final post on the Parks Canada project and then I'll stop talking about it. It went on a few weeks longer than I expected and I blame a lot of that on the weather slowing down some of the final drying stages. The photos show the original Inuvialuit artifacts alongside the reproductions. These aren't casts - they are 1:1 reproductions made in the original materials; wood for wood, antler for antler, tin for tin, etc. All of the artifacts have Parks Canada numbers attached to them somewhere. I marked or engraved a "TR" in the same location on all of the reproductions to help distinguish them from the originals. I have one last meeting in at The Rooms this morning. Elaine Anton has been a tremendous help arranging the shipping and storage of the artifacts while I've been working on them. Today she assesses the condition of the artifacts to ensure that there was no deterioration of their condition over the summer and we'll package everything up for FedEx to pick up. Later today the artifacts go back to the conservation lab in Winnipeg and the reproductions head to the Parks Canada Office in Inuvik.

Ivvavik National Park:


Artifacts in the middle, reproductions above and below


Artifacts in the middle, reproductions left and right

Aulavik National Park:


Artifacts (bottom) Reproductions (Top)


Artifacts (bottom) Reproductions (Top)

Tuktut Nogait National Park:


Artifacts (bottom) Reproductions (Top)


Artifacts (bottom) Reproductions (Top)

Photo Credits: Tim Rast

Photo Captions:
First: The "TR" Signature. Well, technically I snuck in a Lazy L there for my middle initial, too.
Second-Seventh: Artifact Comparisons.

Monday, October 26, 2009

Final Parks Reproductions

Here's a look at the last of the Inuvialuit artifact reproductions done for Parks Canada in Inuvik. I'll post side by side group shots of artifacts and reproductions from each of the three parks in a future post.

Tuktut Nogait Bow: Tuktut Nogait National Park. This reproduction was great fun to do and although this isn't a functional bow I learned a lot about bow-making from this artifact and I still plan to make a working copy of this bow over the winter. Its made from yew. Its in two parts with a V or fishtail splice through the shorter, lower limb. Its very light and thin limbed compared to a lot of other cable backed bows that I've come across.
In each photo the artifact is shown closest to the ruler, with the reproduction on the opposite side. In the first two photos the pieces are shown belly side up, and in the third the bow's back is facing up. I've already talked a lot about making this piece in earlier posts. Finishing involved a lot of wire brushing to bring out the wood grain and match the weathered texture. The colour and texture matching came from rock dust, sawdust, water based stains, red ochre, charcoal, and burnt umber. This is a piece that will benefit from handling. The more wear and tear the reproduction gets the better it will look.


Slate Knife: Ivvavik National Park. The artifact is in the middle. This knife is a little unusual in that its chipped slate instead of ground slate. Ground slate knives may be roughly shaped by flaking, but slate isn't a very good stone for knapping. Usually slate is finished by grinding and polishing. The handle portion of the original artifact is almost completely unworked, so the chipped blade may have been a quick attempt to turn a knife shaped rock into a real knife. Slate is a pretty soft stone that likes to break apart along flat planes, which is why its so difficult to knap. Under the sawdust and woodshavings in in my workshop there are at least a dozen failed attempts at making these two knives. I finally had to go with a slate that isn't as perfect a colour match as what I was hoping, but the best look alike slate I had found refused to stay in one piece. These reproductions will be much more durable, I feel much more confident sending them off knowing that they will be able to hold up to the sort of handling they are intended for.

Antler Handle: Tuktut Nogait National Park. This is an antler socket that was extremely deteriorated. It was a challenge to reproduce because I wanted to match the flakey weathered look of the original, but at the same time have something that wouldn't fall apart being handled. There's not much point in making a reproduction of a fragile artifact that is more fragile than the original. To match the texture and colours of the piece I used layers and layers of sawdust, antler dust, whalebone shaving, and rock dust. In between the layers I'd brush with a wire brush to create the pitting and texture of the disintegrating antler. There was plenty of blowtorch in there as well.
In both photos the artifact is on the left and the reproduction is on the right.
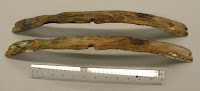
Kayak Rib: Tuktut Nogait National Park. This was that bent wood piece that was giving me so much trouble. I finally got it to hold its shape by building a stand for it. As long as its stored in its stand there's no danger of it straightening out again. There is an interesting patch of green staining on one end which I used verdigris from the copper experiments earlier in the summer to match. It gave a very good match - I wouldn't be at all surprised if the staining on the artifact came from contact with copper.
I keep referring to this as a kayak rib, because that's what I think it is. I don't have any evidence for that other than the fact that its shaped an awful lot like a kayak rib and I'm not sure what else it might have been used for.
In both photos the artifact is closest to the ruler. I'm going to try to be more consistent in the future with my photography or artifacts and reproductions, with artifacts always below or to the left of the reproductions.

Photo Credits: Tim Rast

Photo Captions:
Top: Detail of Tuktut Nogait collection comparison - more to come next time!
Second: Side by side comparison of Tuktut Nogait Bow (Artifact: Left, Reproduction: Right)
Third: Side by side comparison of Tuktut Nogait Bow limb (Artifact: bottom, Reproduction: top)
Fourth: Side by side comparison of Tuktut Nogait Bow (Artifact: bottom, Reproduction: top)
Fifth: Slate Knife, artifact in the middle, reproductions above and below
Sixth: Antler socket comparison, (Artifact: Left, Reproduction: Right)
Seventh: Antler socket comparison, (Artifact: Left, Reproduction: Right)
Eighth: Wood rib comparison, (Artifact: Bottom, Reproduction: Top)
Ninth: Wood rib comparison, (Artifact: Bottom, Reproduction: Top)

Friday, October 23, 2009

Fort Garry Tobacco Tin and Quartzite, Again, Finally

I ate about six pounds of jujubes, gummy worms, and gum balls yesterday so it must have been a good birthday. Lori also topped up my chocolate covered espresso beans to help me wake up in the mornings, which is good because six pounds of jellied sugar rolling around your guts sure doesn't make you want to pop out of bed the next day. I also got a bunch of new clothes including this shirt.

I had hoped that yesterday would be the last day working on the Parks contract, but after comparing the final reproductions to the artifacts and talking to a conservator friend who works at The Rooms, I realized that almost everything was missing an important brown colour. Its all done, but the last set of artifacts could really use some more Burnt Umber, so on the way home I stopped at MF Kelly and picked up some pastel and charcoal sticks to grind up and dust on. I have one more trip today to confirm that Burnt Umber made them good and then thats it. It'll just be packing and shipping after that.

Fort Garry Tobacco Tin: Aulavik National Park. The reproduction is above the original in both photos. This was a new sort of reproduction for me so it had a bit of a learning curve. I've talked a little about the history of the tin and my approach to reproducing it in previous posts. The words that you can't quite read say "FORT GARRY SMOKING TOBACCO". Aging the paint and adding the rust were the most challenging aspects of this project. I wound up using white washes over areas of the paint to create the sun bleached look of the paint. Without the white wash the paint colours and contrast were a little too sharp. The rust/paint boundaries were still a little sharp. In the artifact there is a kind of rusty halo that creaps out around the exposed rusted metal into the adjacent paint. On my reproduction the paint/metal boundaries were too sharp until I added a final red ochre wash around the rust patches to create the fuzzy boundaries and depth that I needed.

It was possible to have a lot more control over the rust than I'd imagined. The paint did its job and prevented the muriatic acid from rusting anywhere that it touched. To guide the shape fo the rust pattern all Ihad to do was scrape off the paint in the areas that I wanted to rust. Once the muriatic acid had rusted an area I could tweak the colour by adding water, sunlight and a quick drying environment to give me brighter reds and oranges. Dabbing a bit of tea on the rust would turn it black from the tannins. The piece was constantly evolving and responding to the temperature and air around it, on dry days it would be more orange and on damp days it would be more black. To try and stabilize it at the point I wanted it, I sprayed on a clear varnish. I needed that clear finish to match the gloss of the original tin and blocking out the air should prevent future changes in the rust colour.

Quartzite Scraper: Tuktut Nogait National Park. The artifact is on the left and the reproduction is on the right. This is the last piece of quartzite in this contract. I don't know how many versions of this piece I made over the summer, but I destroyed most of the quartzite that Jack Cresson gave me trying to get this piece out. Basically, its a very short hard hammer flake removed from the dish shaped flake scar of a previous hard hammer flake. Its part of a cone made on the negative space made by a cone. Its another one of those really simple and really difficult pieces to make. The original artifact would have taken less than 20 seconds to make by hitting one rock with another rock twice. But trying to match those exact conditions a few hundred years later is like trying to copy a snowflake. Like I said on Wednesday, the simpler something is the harder it is to reproduce.

Photo Credits:
Top: Lori White
Second-Fourth: Tim Rast

Photo Captions:
Top: Comparing Fort Gary Smoking Tobacco Tins in my birthday shirt
Second: Fort Garry Tobacco Tin (bottom) and reproduction (top)
Third: Back of the Fort Garry Tobacco Tin (bottom) and reproduction (top)
Fourth: Quartzite flake scraper (left) and Reproduction (right)

Wednesday, October 21, 2009

Marrow Extractor and Flakes

In the next couple of posts I'll show the final Inuvialuit reproductions in the Parks Canada contract. Everything is built and I'm in the final few hours of antiquing. The cold damp weather in St. John's over the past six weeks has really slowed this job down, because the drying time between stages has been so long. On Monday, I compared all the remaining reproductions to the artifacts and if I absolutely had to, I could have called them all finished. But I didn't, I took a half dozen or so home for one final pass to try and match the finished colours and textures a little more closely. I'll compare them one last time tomorrow and then everything can be shipped next week. The artifacts go back to a conservation lab in Winnipeg and the reproductions will go to the Parks office in Inuvik.


Marrow Extractor: Tuktut Nogait National Park. This is a relatively simple stick of yew that was identified as a marrow extractor. The long bones of caribou are full of nutrient rich marrow and sticks like this can be used to push or scoop it out of the hollow cavity in the bone. It took a while to match the look of the white rot on the end of the artifact. The reproduction is shown in the photo below the original. I made it on a scrap of yew left over from the bow.


Quartzite Flakes: Tuktut Nogait National Park. (Originals on the left, reproductions on the right) These flakes took me all summer to make. Quartzite isn't a common material in Newfoundland and although it can be chipped into durable functional tools, its not a favourite of modern knappers. I tried a lot of different sources trying to get quartzites that match the artifacts in this collection. I found that I had a decent match for the light grey quartzites from Tuktut Nogait, but I couldn't find any purplish-red. I wound up going with a local sandstone. It gave me a decent look alike, but sandstone doesn't knap very well, so it took a long time to get a passable looking soft hammer flake. The smaller piece might be the base of a roughly made tool, or it might be a random piece of shatter - its tough to tell on quartzite. Side by side they are decent enough matches, but from a functional perspective they don't have much in common with the artifacts.

I'm finding with this job that the amount of time involved with matching an artifact is inversely proportional to the simplicity of the piece. The more modified a piece is by people the easier it is to match. The randomness of nature is much harder for me to recreate than the intentional work of a person.

Photo Credits:
Top: Lori White
Middle & Bottom: Tim Rast

Photo Captions:
Top: Planning a reproduction at the beginning of the summer
Middle: Marrow extractor, Top; Artifact, Bottom; Reproduction
Bottom: Flakes, Artifacts on the left, reproductions on the right

Monday, October 19, 2009

Miniature People in the Archaeological Record

Here's an interesting story that was sent to me by Mike Odegard, the State Resource Conservationist in Nevada:

On another note I wanted to tell you a quick story that came to mind as I was reading your website. While growing up in Montana... From time to time I would find very tiny points which the local people called bird points. As I grew older I had a chance to work with a lot of the tribes in MT and as I was telling an old Crow elder about the little points one day he said Oh ya those are from the little people. I asked him what he was talking about and he said that they had stories about a tribe of very little people that had once lived where the Crow live today. He said that the story was that the little people lived in the ground and were rarely seen however they did trade with them by leaving stuff and when they returned their stuff had been replaced with other stuff. Several months later he took me to a place in the Pryor mountains and showed me a place where there were many cutouts in the sandstone where he told me the "little people" had corraled there small horses. Sounds like American elfshot.

I love stories like that, and Mike's right it does sound a lot like an American version of Elfshot.

Miniature versions of artifacts show up in the archaeological record frequently. In Newfoundland, arrowheads that appear too small to function are very common in Beothuk sites. The tiny arrowheads in the top row of the photo at the top of this post happen to be from Burgeo, but they could have been found at any Beothuk site in the province. The neck of an arrowhead gives you a good estimate of the diameter of the shaft that it was mounted on. Beothuk bows were designed to be the height of the owner, about 6 feet long, and the arrows would be the length of the draw from the archer's chin to the tip of their outstretched finger, or about 3 feet. However, many points found at Beothuk sites have neck widths less than 5mm wide, they'd fit on an arrow the diameter of a skinny drinking straw. Much too small to be a functional 3 foot long arrow. So who used these tiny arrows?

If the bows and arrows were designed to fit the user, then where do you find someone small enough to use these tiny points? Have you figured it out? This black and white photo is the last clue. Its a plate from James Howley's 1915 book - The Beothucks or Red Indians. Items numbered 2 are arrow shafts, 3s are bow fragments and 4s are miniature arrow shafts and bow fragments found in a child's grave. Children in the past played with scaled down versions of adult tools, just as they do now. Its quite likely that the tiny arrowheads really were used by tiny people -- teacup humans -- the children of the people who used the adult sized points.

Bob Dawe in Alberta published a paper in 1997 looking at the child-sized points that Mike is refering to in his story, called Tiny Arrowheads: Toys in the Toolkit, and Ralph Pastore suggested that many of the tiny Beothuk points were used by children in an unpublished paper from about the same time.

Photo Credits:
Top: Tim Rast
Middle: Erick Walsh
Bottom: James Howley from the Newfoundland and Labrador Heritage Website

Photo Captions:
Top: Beothuk Points from Burgeo, Newfoundland and Labrador. Collected by Sid Bagg.
Middle: An Elfshot reproduction of a Beothuk Arrow
Bottom: Plate showing Beothuk wooden objects including (2) Beothuk arrow fragments, (3) bow fragements, and (4) Miniature bow and arrow fragments from a child's grave.

Friday, October 16, 2009

Antler Reproductions and Apple Picking

We had a new addition to our backyard thanks to Wednesday's windstorm. Our neighbor's 30ft apple tree blew over into our yard, right across my path to work. St. John's was reported to have received 50 mm of rain and had wind gusts up to 122km/hour. When the tree went down it was being plastered by slush pellets and weighed down by its own leaves and apples. There was no damage done and in about 90 minutes on Thursday morning Lori and I picked 3 bags of apples and chopped up the tree and returned it to the neighbor's yard in 4 big piles. She's going to have a bit of a surprise when she gets back from Vegas!

I don't have any trips to The Rooms this week, but my plan is to have everything from the Parks job finished for my next visit. There are always things to tweak the first time I think things are finished, so realistically I'll need at least one more trip after that to really be done, but I need to wrap this job up and dedicate more time to Craft Fair preparation.

Here's a look at the latest finished Parks Canada Inuvialuit reproductions:

Composite Barbed Antler Point: Aulavik National Park. This was a one of the more complicated pieces in the job, because its a composite of two separate antler pieces and three iron rivets (plus at least a half dozen different lichen varieties) . I made the antler point and brace longer than necessary so that I could break them to the correct length and antique them. For the rivets I used sections out of a wire coat hanger, heated and hammered to create the rivet heads and then rusted with Muriatic acid. The final stage was gluing on the lichen. This is one of those pieces that I get confused on which is the artifact and which is the reproduction when they are side by side (artifact is on the left and reproduction is on the right). Barbs like that often mean fishing, but I'm not certain if that's the function of this artifact or not. I don't know a lot about the site it was found at.

Drilled Antler: Aulavik National Park. The artifact is on the left and the reproduction is on the right. This is a little antler brace piece that would probably would have functioned similarly to the small piece on the composite barbed antler. Both the original and the reproduction are made from caribou antler that has been weathered white and covered in lichen. The biggest difference is that the lichen grew on the original piece and I lifted mine from rocks near St. John's. The bright orange lichen is called jewel lichen and it grows on rocks fertilized by birds. Fortunately there are varieties that grow in Newfoundland that are a pretty good match for the jewel lichen that grows in the Arctic.

Photo Credits:
Top: Tim Rast
Second: Lori White
Third-sixth: Tim Rast

Photo Captions:
Top: The new addition to our back yard
Second: Disassembling the apple tree so I could walk to work.
Third: Side by side comparison of the composite antler barbed point (original left, reproduction right)
Fourth: Side by side comparison of the composite antler barbed point (original foreground, reproduction back)
Fifth: Side by Side comparison of the drilled caribou antler artifact (original left, reproduction right)
Sixth: Side by side comparison of the drilled caribou antler artifact (original background, reproduction foreground)

Wednesday, October 14, 2009

Maritime Archaic Indian Harpoon Reproduction

Here's the completed Maritime Archaic Indian harpoon reproduction for The Rooms. Everywhere that I had an artifact for reference I made the reproduction as identical as possible to the source material, using the appropriate materials and finishes. In this case, I had antler harpoon heads and whalebone foreshafts to work from. The sealskin line and spruce foreshaft are speculative, but they use available materials and I tried to work in as many Maritime Archaic references as possible into their design.

Some harpoon foreshafts are designed to bend or release from the harpoon mainshaft and some are designed to be fixed solidly. The Maritime Archaic foreshafts could go either way, but I took the barbed prongs on some of the artifacts to indicate that they were designed to stay firmly planted in the foreshaft. In order to make that work, I notched out a deep "V" shaped notch in the mainshaft, leaving a channel of wood in place to fit in the slot in the foreshaft. I filed the mainshaft down and wrapped part of the end with rawhide to enclose the slot. The barbs on the foreshaft prongs catch on the rawhide - it almost clicks into place.

I don't know how or if the harpoon line would attach to the mainshaft, but I worked around a knot in the shaft and made a hole for the line. The advantage of the line being attached to the mainshaft is that even after the harpoon head comes off, everything stays together and you don't need to worry about losing any of the pieces in the excitement of catching your supper. The harpoon shaft can also function as added leverage for hauling the seal out of the water. I tried to echo the shape of the hole in the harpoon head in the line hole on the mainshaft. Its speculative, but the more of those little references that I can build into a piece the more comfortable I am. If I need to create something from scratch I like to echo shapes and patterns that recur in other artifacts belonging to a particular culture. The long harpoon mainshaft with an oval and circular cross-section is based on the foreshaft, and the rawhide wrapping to hold the foreshaft in place is based on the sinew wrapping around the slot for the harpoon head.

For the line I used bark tanned seal skin. I'd really like to get some bearded seal skin for harpoon lines, but its not easy to come by in Newfoundland, compared to harp seal. I kept the line as simple as possible and made a relatively tight loop through the harpoon head. I figured that since this harpoon head is not intended to toggle, there was no need for a large loop for the harpoon head to spin through and possible get caught up in.

The whole harpoon was antiqued and ochre stained. When the antler, whalebone, and wood are freshly worked they are shades of white and yellowish-white. They aren't coloured like the ancient ochre covered artifacts. I don't always ochre stain Maritime Archaic reproductions. The Maritime Archaic certainly used red ochre, and lots of it, in the burials and other ceremonial contexts, but we know relatively little about their day to day lives. The Beothuk covered their bodies and all of their belongings with red ochre thousands of years later, but I'm not sure if we have definitive proof that the Maritime Archaic used ochre in their day to day lives in the same way. It might have just been something reserved for special occasions. Or not, I don't know. Red ochre certainly helps make an interesting object and given the context that this harpoon is going to be used for (teaching kids in a museum as opposed to sneaking up on seals on the ice) I think its an appropriate finish. It also gave me a chance to try a new ochre paint recipe. Robin Wood's fantastic heritage crafts blog has all kinds of goodies on it, including an egg, linseed oil, and water based paint recipe. I like the look of it, although the weather we've been having in St. John's is really not helping an oil based paint dry. At some point I'd like to try this recipe with fish oil instead of linseed. The Beothuk were reported to have mixed their ochre with caribou grease. Anyone get a caribou this fall?

Photo Credits: Tim Rast

Photo Captions:
First: Complete Maritime Archaic Indian Harpoon reproduction on Harp Sealskin
Second: Reproduction Foreshaft detail
Third: Foreshaft/Main Shaft join detail
Fourth: Line holes on the main shaft and the harpoon head
Fifth: The rawhide binding to catch the forks of the main shaft echoes the sinew wrapping on the distal end of the foreshaft to hole the harpoon head in place
Sixth: Closeup of the barbed harpoon head in the foreshaft socket.

Monday, October 12, 2009

Researching the Maritime Archaic Indian Harpoon

I had a great time at The Rooms last Friday - I have a couple more pieces to add to the Parks "finished" pile and I had a productive session looking at Maritime Archaic tradition harpoon parts.

The Maritime Archaic Indians lived on the Island of Newfoundland from at least 5500 years ago until about 3200 years ago. Their ancestors travelled north to the Labrador side of the Strait of Belle Isle as early as 9500 years ago. The style of harpoon that I'm researching is a barbed, non-toggling type of harpoon that was a popular grave item in the Cemetery at Port au Choix, ca. 4400-3300 years ago. The cemetery had excellent bone preservation, both human and faunal.

The harpoon foreshafts were identified at the time as whalebone, but I recall that when Bill Ritchie was examining the artifacts for his interpretive paintings of Maritime Archaic culture for The Rooms that he felt strongly that at least some of them were walrus baculum. Also called Oosik, walrus penis bones are made from a strong, dense bone that would require relatively little modification to create a typical Maritime Archaic harpoon foreshaft. Several years ago, Bill brought back a walrus baculum for me, which he purchased in Cape Dorset through the West Baffin Eskimo Co-operative (now Kinngait Co-operative). Its a heavy, club-like bone, which I've been keeping in my office as a first line of defense against zombie attacks.

I took the baculum and a sample of whale rib with me to compare against the foreshafts on Friday. Comparing a 4000 year old worked artifact to a fresh, unworked bone might be a little like comparing apples and oranges, but I'm fairly confident that there are both whale bone and walrus bacculum foreshafts in the collection. Because they are marine mammals, both walrus and whales have relatively porous, light bones. The middle of whale bones are so spongy that they aren't very useful for making tools from, and even the denser outer layers of bone have pore space. Those pores have a stretched, dashed line appearance, giving a kind of very fine wood grain appearance that runs parallel with the long axis of the bone. Walrus baculums are much denser, almost like ivory. They also have pore spaces, but the holes are more circular and wider spaced. Something about it reminds me of cat's whiskers.

Whale bone Detail: Bone foreshaft top, and modern whale rib below


Walrus Baculum Detail: Bone foreshaft top, Walrus Baculum Below. Is it a match? Its different from the other whalebone fragments and has circular pores, like the baculum, although they are larger in the worked example.

I did a very quick, unscientific survey and the majority of the foreshafts I looked at matched the whalebone sample I compared them against. One had circular pores, similar to the baculum, but I wouldn't be at all surprised if there are more in the collection. There are many walrus ivory artifacts from Maritime Archaic Indian sites and some of their hunting tools seem specially designed for hunting larger sea mammals, like walrus and small whales. However, for my purposes, I'm happy to know that I can make a faithful reproduction using whalebone and that I can keep my baculum handy, in case of a zombie outbreak.

The second puzzle that I was trying to work out were how the foreshafts work. There is no wood preservation at Port au Choix and the mainshaft of the harpoon would have almost certainly been made from wood. I could figure out the smaller end, the barbed harpoon heads fit neatly into those sockets. But the opposite end, are wide and flat and frequently forked. Its an unusual design and completely different from the later Palaeoeskimo and Thule harpoons that I'm familiar with. I haven't been able to find similar harpoon foreshafts anywhere else in the world.

The closest analogs that I've been able to find have been Auragnacian split-base points from the Upper Palaeolithic in Europe and some 10,000 year old arrows from Ahrensburg, Germany. Neither of these are exactly like the Maritime Archaic foreshafts, but they got me thinking about this kind of spliced join. They are relatively easy to make using stone tools, you just gouge out matching notches, rotate one of the notches 90 degrees and the two pieces join together, like my hands in the photo. Many of the foreshafts from Port au Choix have additional details added, like little barbs on the forks or holes, but basically, I think they are a modified version of that very simple and very old concept.

What do you think? How would you attach these foreshafts to a wooden shaft? Would they move or are they designed to be secure? How do the little barbs work?

I'll show you my solution in Wednesday's post.

Photo Credits:
First: Tim Rast
Second: Jim Tuck, published online in Museum Notes: The Martime Archaic Tradition
Third-Seventh: Tim Rast
Eighth: Schleswig-Holsteinisches Landesmuseum, published in Ascent to Civilization, 1984
Ninth: Tim Rast

Photo Captions:
First: Tracing and measuring the artifacts
Second: Maritime Archaic Burial at Port au Choix, note the bone foreshafts over each shoulder.
Third: From Top to Bottom, Possible Walrus Baculum Foreshaft, Walrus Baculum, Whalebone Foreshaft, Whale Rib
Fourth: Comparing a foreshaft to a closeup of a whale rib
Fifth: Comparing a foreshaft to a closeup of a Walrus baculum
Sixth: Fitting a barbed harpoon head into the slot of a whalebone foreshaft
Seventh: Detail of the forked and barbed end of a foreshaft - how does that work?
Eighth: Detail of the Ahrensburg arrows - a possible analog for the Maritime Archaic foreshafts?
Ninth: Using my hands to show how the Ahrensburg splice works.
Related Posts with Thumbnails